
Yelp Recommendation and Sentimental Analysis is one of the most useful analysis for foodies who want to great recommendations for restaurants that they would love to go to. Our personalized recommendation system provides a better user experience by incentivizing users to review and rate more in return for better restaurant recommendations;this in turn gives Yelp more data that can be used to further improve the recommendation system. We have created a model which would predict the rating based on their reviews 89% accurately. Businesses often want to know what customers think about the quality of their services to improve and make more profits. Restaurant goers also want to learn from others' experience using a variety of criteria such as food quality, service, ambience, discounts and worthiness. Our Sentimental Analysis does a topic modelling to further classify the restaurants based on the topics the reviewers discuss about.
• Data has been collected from the Yelp.com in the form of .json files(raw data)
https://www.yelp.com/dataset
• You would need to download the following files from the dataset
. business.json . user.json . review.json
• 1,100,000 tips by 1,300,000 users
• Over 1.2 million business attributes like hours, parking, availability, and ambience
• Aggregated check-ins over time for each of the 174,000 businesses
Anaconda is a free and open-source software distribution for data science. In a nutshell, it's an up-to-date, comprehensive bundle of the most popular tools and libraries in this field and enables you to dive in quickly and easily.
https://www.anaconda.com/download/
Choose Python 3 Version and Select the default options when prompted during the installation of Anaconda.
- Open the Start menu, start typing "environment" and select the option called Edit the system environment variables
- Select the Environment Variables button near the bottom
- In the top section containing user variables, select the one called Path and choose to edit it
- Create a new variable whose name refers to the location of the "Scripts" folder, which is inside whichever folder you chose to install Anaconda
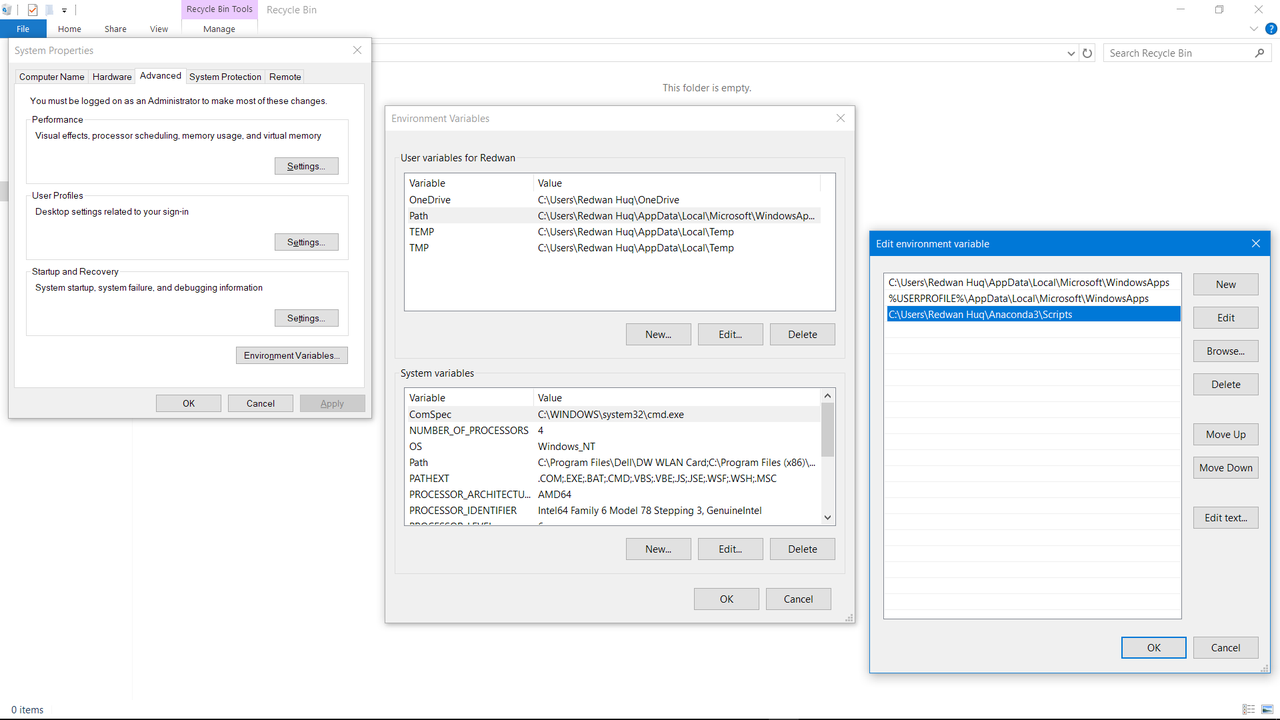
Let's begin by opening Command Prompt and creating a new conda environment with Python.
conda create --name deeplearning python
Feel free to change deeplearning to whatever you'd like to call the environment. You'll be prompted to install various dependencies throughout this process—just agree each time.
Let's now enter this newly created virtual environment.
activate deeplearning
If you're following along in Command Prompt, notice the prompt is now flanked by the name of the environment in parentheses—this indicates you're inside.
Earlier, the Anaconda installer automatically created a conda environment called root that houses the core libraries for data science. Since we've now moved into a different environment, we can't access those libraries unless we re-install them and their dependencies in the new environment. Fortunately, we can use conda to install a few packages that cover everything we need. Because I make heavy use of the core data science libraries, I installed every package listed below. Make sure to install them in order listed below; only Seaborn and Scikit-learn are optional.
IPython and Jupyter are a must for those who rely on Jupyter notebooks for data science (who doesn't?).
conda install ipython
conda install jupyter
Pandas includes the de facto library for exploratory analysis and data wrangling in Python.
conda install pandas
SciPy is an exhaustive package for scientific computing, but the namesake library itself is a dependency for Keras.
conda install scipy
Seaborn includes my favorite high-level visualization library. If you're still exclusively using Matplotlib for plotting, do yourself a favor and take a look.
conda install seaborn
Scikit-learn contains the go-to library for machine learning tasks in Python outside of neural networks.
conda install scikit-learn
We're finally equipped to install the deep learning libraries, TensorFlow and Keras. Neither library is officially available via a conda package (yet) so we'll need to install them with pip. One more thing: this step installs TensorFlow with CPU support only; if you want GPU support too, check this out.
pip install --upgrade tensorflow
pip install --upgrade keras
A quick way to check if the installation succeeded is to try to import Keras and TensorFlow in a Jupyter notebook. Here are two ways to access Jupyter:
- Open Command prompt, activate your deep learning environment, and enter
jupyter notebookin the prompt - Open Anaconda Navigator (use the Start menu shortcut), switch to your deep learning environment in the Applications on drop-down menu, and then choose to open Jupyter
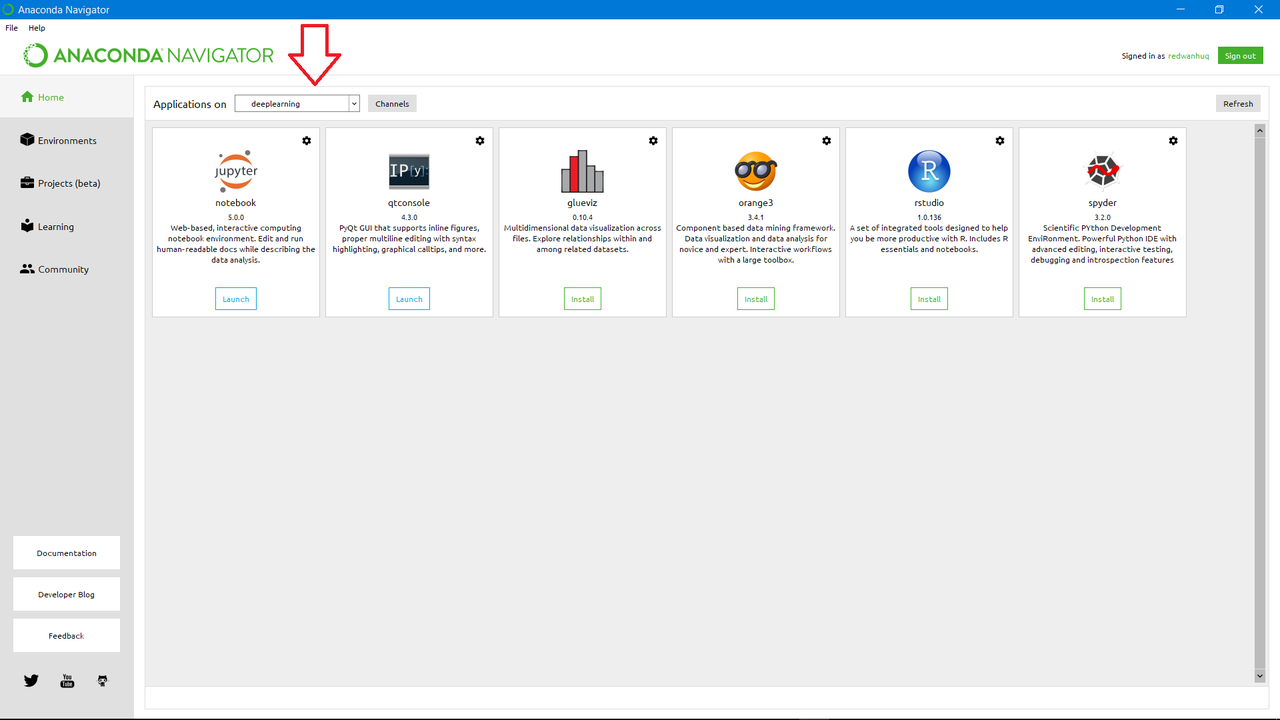

The first option is a lot faster. If you missed a step or made a mistake, you can always remove the conda environment and start over.
conda remove --name deeplearning --all
Otherwise, you should have TensorFlow and Keras ready to go.
Gensim is a Python library for topic modelling, document indexing and similarity retrieval with large corpora. Target audience is the natural language processing (NLP) and information retrieval (IR) community.
This software depends on NumPy and Scipy, two Python packages for scientific computing. You must have them installed prior to installing gensim.
It is also recommended you install a fast BLAS library before installing NumPy. This is optional, but using an optimized BLAS such as ATLAS or OpenBLAS is known to improve performance by as much as an order of magnitude. On OS X, NumPy picks up the BLAS that comes with it automatically, so you don’t need to do anything special.
The simple way to install gensim is:
pip install -U gensim
Or, if you have instead downloaded and unzipped the source tar.gz package, you’d run:
python setup.py test
python setup.py install
To install Spark, make sure you have Java 8 or higher installed on your computer. Then, visit the Spark downloads page. Select the latest Spark release, a prebuilt package for Hadoop, and download it directly.
You may need to restart your terminal to be able to run PySpark. Run:
$ pyspark
Welcome to
      ____              __
     / __/__  ___ _____/ /__
    _\ \/ _ \/ _ `/ __/  '_/
   /__ / .__/\_,_/_/ /_/\_\   version 2.1.0
      /_/
Using Python version 3.5.2 (default, Jul  2 2016 17:53:06)
SparkSession available as 'spark'.
>>>
There are two ways to get PySpark available in a Jupyter Notebook:
- Configure PySpark driver to use Jupyter Notebook: running
pysparkwill automatically open a Jupyter Notebook - Load a regular Jupyter Notebook and load PySpark using findSpark package
First option is quicker but specific to Jupyter Notebook, second option is a broader approach to get PySpark available in your favorite IDE.
For everything to work in Windows, we’ll have to add some environment variables which point to our new folders. You can access this by typing in “variables” in the start menu. Click “Edit the system environment variables” when it appears and then click the “Environment Variables” button. We are going to be adding the following entries. Update yours depending on your path.
- JAVA_HOME = %ProgramFiles%\Java\jdk1.8.0_131
- SPARK_HOME = C:\spark\spark\bin
For the last one, I had created a new Anaconda environment, but just point this to wherever python.exe is. If you are planning to use Jupyter Notebooks then add the last two lines as well.
-
PYSPARK_DRIVER_PYTHON= your_path_to_anaconda\Anaconda3\envs\pyspark\Scripts\jupyter.exe
-
PYSPARK_DRIVER_PYTHON_OPTS = notebook
-
Add C:\spark\spark\bin to your path
There is another and more generalized way to use PySpark in a Jupyter Notebook: use findSpark package to make a Spark Context available in your code.
findSpark package is not specific to Jupyter Notebook, you can use this trick in your favorite IDE too.
To install findspark:
$ pip install findspark
Launch a regular Jupyter Notebook:
$ jupyter notebook
That should be it. You can test if PySpark is working by opening up a command prompt window and typing in “pyspark”. A Jupyter Notebook should immediately open. Create a new notebook and run “sc” which is the already created SparkContext.
The first attempt may take a few seconds before anything loads. But if you see the output below, you’re ready to start using Spark! Remember you can always use the shell version back at the C:\spark\spark\bin folder if you want.
Why Flask?
- easy to use
- built in development server and debugger
- integrated unit testing support
- RESTful request dispatching
- uses Jinja2 templating
Install Flask using the command below:
$ pip install Flask
To test our trained models you would have to install flask application and PostMan.
Run the web app using this command:`$ python Yelp.py
https://github.com/shrican/yelp-recommendations-sentimental-analysis/blob/master/src/scripts/Yelp.py
- Running on http://localhost:8000/`
Postman is available as a native app for Mac, Windows, and Linux operating systems.
To install Postman, go to the apps page and click Download for Mac / Windows / Linux depending on your platform.
The Postman Chrome app can only run on the Chrome browser. To use the Postman Chrome app, you will first need to install Google Chrome.
After you have trained your als-models per state, you need to make sure the als-model folder is there in your classpath for the flask application to be able to load it.
You can run the flask application and you should get the output like the following:

