CI Status | DOI: 10.5281/zenodo.240890
Python interface for the Horizontal Wind Model version 2014 (HWM14)
Currently requires Python 3.13+ with scikit-build-core (see Github Actions).
IMPORTANT: For support in other Python versions and/or OS, users are invited to work on the case and submit a PR. Help making the project more generic!
$ git clone https://github.com/rilma/pyHWM14.git
$ cd pyHWM14
$ make installThe repository uses uv (a fast, modern Python package manager) for managing Python versions and dependencies. All targets automatically install and use uv if needed.
| Target - Purpose |
|---|
make install-python313
- Installs Python 3.13 with uv (if needed) and pins .python-version to 3.13. |
make install-gfortran
- Installs gfortran if missing using sudo apt-get (Debian/Ubuntu). On macOS/Windows, install a Fortran compiler manually first. |
make venv313
- Creates/recreates a local .venv313 using Python 3.13 via uv. |
make install313-sci
- Installs build + dev/test tooling (scikit-build-core, cmake, ninja, numpy, meson, pytest, pytest-cov, ruff, mypy, black, pre-commit), upgrades pip, then installs the project via uv pip. |
make install
- End-to-end setup shortcut (Python 3.13 + compiler + dependencies + editable install). The compiler auto-install step is Debian/Ubuntu-only. |
make test313
- Runs the test suite using Python 3.13. |
make test
- Alias for make test313. |
make clean
- Removes build/test artifacts. Use make clean CLEAN_VENV=1 to also remove .venv313. |
make pre-commit-install
- Installs pre-commit git hooks using .venv313. |
make pre-commit-run
- Runs all pre-commit hooks across the repository. |
make lint
- Runs Ruff lint and format checks. |
make type-check
- Runs mypy on the package. |
make check
- Runs make lint then make type-check. |
make fix
- Runs Ruff format/lint fixes and then mypy. |
About uv: The project uses uv (https://github.com/astral-sh/uv) for fast, reliable dependency management and Python version control. Benefits include:
- ⚡ 10-100x faster than pip
- 📦 Reproducible builds via
uv.lock - 🎯 Single tool for Python + package management
- 🔒 Superior dependency resolution
Typical workflow:
$ make install
$ make test
$ make check
$ make pre-commit-install
$ make pre-commit-run
Cleanup examples:
$ make clean
$ make clean CLEAN_VENV=1
Additional quality targets:
make lint: Run Ruff lint + format checks forpyhwm2014andtests.make type-check: Run mypy onpyhwm2014.make check: Runlintandtype-check.make fix: Apply Ruff auto-format and lint fixes, then run mypy.
pip install pyhwm2014
$ make testThis section provides a quick guide to retrieving zonal and meridional wind values from the HWM14 model.
The HWM14 model provides zonal (east-west) and meridional (north-south) wind components in the upper atmosphere. To retrieve wind values, you need to specify:
- Date/Time: Year, day of year (1-366), and universal time (0-24 hours)
- Location: Geographic latitude (-90° to 90°) and longitude (-180° to 180°)
- Altitude: Height above Earth's surface in kilometers
- Geomagnetic Activity: The ap index (default: -1 for climatology)
Wind Components:
- Zonal wind (U): Positive = Eastward, Negative = Westward
- Meridional wind (V): Positive = Northward, Negative = Southward
All wind values are in meters per second (m/s).
Retrieve wind values at a specific location, date/time, and altitude:
from pyhwm2014 import HWM14

# Define parameters
year = 2023
day_of_year = 150  # Approximately May 30
universal_time = 12.0  # 12:00 UT (noon)
altitude_km = 300.0  # 300 km altitude
latitude = 40.0  # 40°N
longitude = -105.0  # 105°W
ap_index = 10  # Geomagnetic activity index

# Retrieve wind values
hwm14 = HWM14(
    alt=altitude_km,
    altlim=[altitude_km, altitude_km],
    altstp=1,
    year=year,
    day=day_of_year,
    ut=universal_time,
    glat=latitude,
    glon=longitude,
    ap=[-1, ap_index],
    option=1,
    verbose=False
)

# Access results
zonal_wind = hwm14.Uwind[0]  # m/s
meridional_wind = hwm14.Vwind[0]  # m/s

print(f"Zonal wind: {zonal_wind:.2f} m/s")
print(f"Meridional wind: {meridional_wind:.2f} m/s")Convert Python datetime to required parameters:
from datetime import datetime
from pyhwm2014 import HWM14

# Your datetime
dt = datetime(2024, 7, 15, 18, 30)  # July 15, 2024, 18:30

# Convert to HWM14 parameters
year = dt.year
day_of_year = dt.timetuple().tm_yday
universal_time = dt.hour + dt.minute / 60.0

# Now use with HWM14
hwm14 = HWM14(
    alt=250.0,
    altlim=[250.0, 250.0],
    altstp=1,
    year=year,
    day=day_of_year,
    ut=universal_time,
    glat=0.0,
    glon=0.0,
    ap=[-1, 10],
    option=1,
    verbose=False
)Use the CLI tool for quick retrievals without writing code:
# Single point retrieval
$ python scripts/retrieve.py --year 2023 --day 150 --time 12.0 \
    --lat 40.0 --lon -105.0 --alt 300.0

# Height profile (multiple altitudes)
$ python scripts/retrieve.py --year 2023 --day 150 --time 12.0 \
    --lat 40.0 --lon -105.0 --alt-range 100 400 50

# Using datetime format
$ python scripts/retrieve.py --datetime "2023-05-30 12:00:00" \
    --lat 40.0 --lon -105.0 --alt 300.0

# Get JSON output
$ python scripts/retrieve.py --year 2023 --day 150 --time 12.0 \
--lat 40.0 --lon -105.0 --alt 300.0 --jsonFor comprehensive examples including height profiles, latitude profiles, and more, see the scripts/ directory which contains various example scripts.
Run the comprehensive examples:
$ python scripts/retrieve_values.pyYou will need seaborn (the statistical data visualization package) in order to run the following examples.
$ pip install seaborn>>> from pyhwm2014 import HWM14, HWM14Plot
>>> hwm14Obj = HWM14( altlim=[90,200], altstp=1, ap=[-1, 35], day=323,
option=1, ut=11.66667, verbose=False, year=1993 )
>>> hwm14Gbj = HWM14Plot( profObj=hwm14Obj )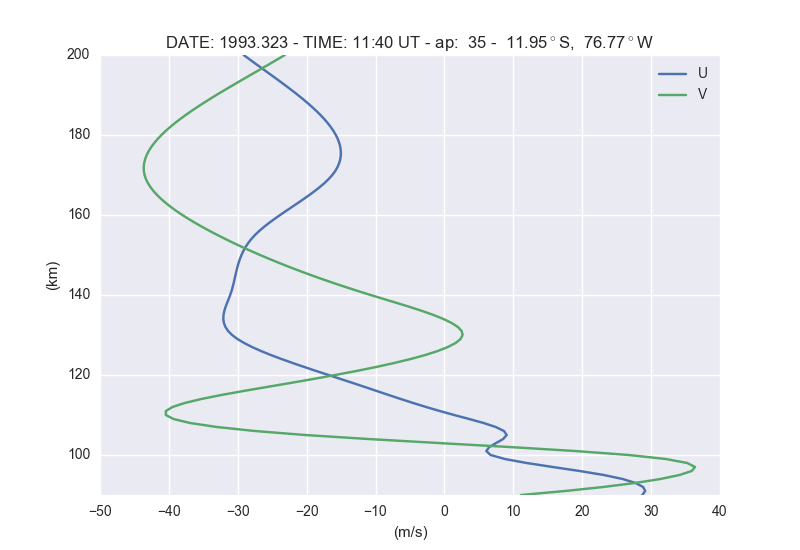
You can also list the values on screen as follows
>>> from pyhwm2014 import HWM14
>>> hwm14Obj = HWM14( altlim=[90,200], altstp=10, ap=[-1, 35], day=323,
        option=1, ut=11.66667, verbose=True, year=1993 )

HEIGHT PROFILE
                 quiet         disturbed             total
 alt      mer      zon      mer      zon      mer      zon
  90   11.112   28.727   -0.001   -0.000   11.112   28.726
 100   26.762    6.705   -0.007   -0.006   26.755    6.700
 110  -40.361    1.468   -0.080   -0.066  -40.442    1.402
 120  -15.063  -16.198   -0.777   -0.640  -15.840  -16.838
 130    5.352  -28.597   -2.713   -2.233    2.639  -30.829
 140   -7.310  -28.295   -3.410   -2.806  -10.720  -31.101
 150  -23.281  -26.597   -3.484   -2.867  -26.765  -29.464
 160  -34.557  -20.983   -3.490   -2.872  -38.047  -23.855
 170  -40.041  -13.405   -3.491   -2.872  -43.531  -16.277
 180  -37.589  -12.893   -3.491   -2.872  -41.080  -15.765
 190  -29.611  -18.405   -3.491   -2.872  -33.102  -21.278
200 -19.680 -26.278 -3.491 -2.872 -23.171 -29.150>>> from pyhwm2014 import HWM14, HWM14Plot
>>> hwm14Obj = HWM14( alt=130., ap=[-1, 35], day=323, glatlim=[-90.,90.],
glatstp=1., option=2, ut=11.66667, verbose=False, year=1993 )
>>> hwm14Gbj = HWM14Plot( profObj=hwm14Obj )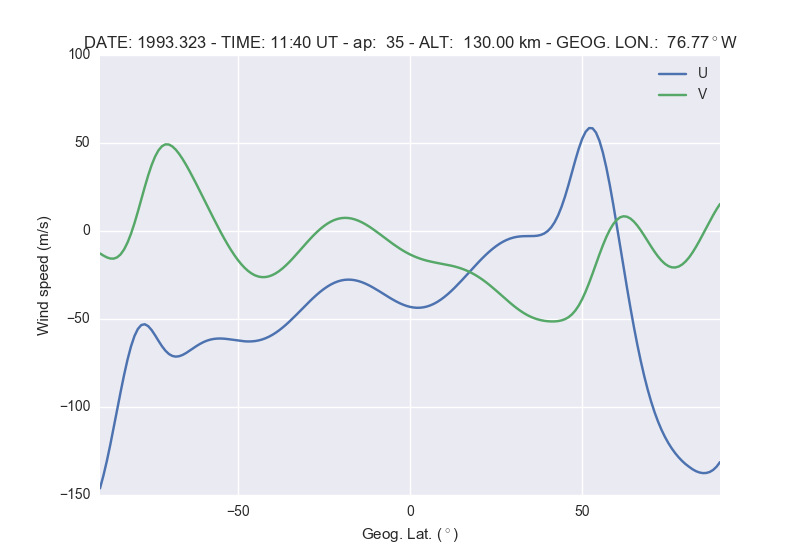
>>> from pyhwm2014 import HWM14, HWM14Plot
>>> hwm14Obj = HWM14( alt=130., ap=[-1, 35], day=323,
        option=3, utlim=[0., 23.45], utstp=.25, verbose=False, year=1993 )
>>> hwm14Gbj = HWM14Plot( profObj=hwm14Obj )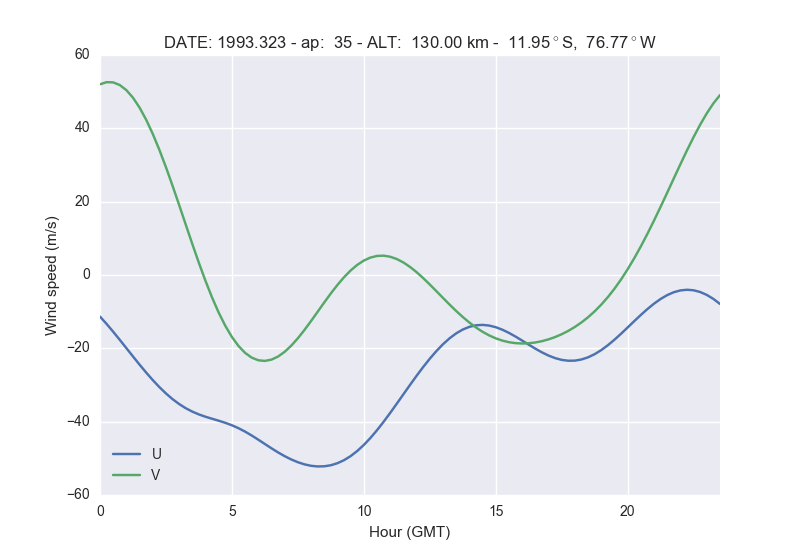
>>> from pyhwm2014 import HWM14, HWM14Plot
>>> hwm14Obj = HWM14( alt=130., ap=[-1, 35], day=323, glonlim=[-180., 180.], glonstp=2.,
        option=4, verbose=False, year=1993 )
>>> hwm14Gbj = HWM14Plot( profObj=hwm14Obj )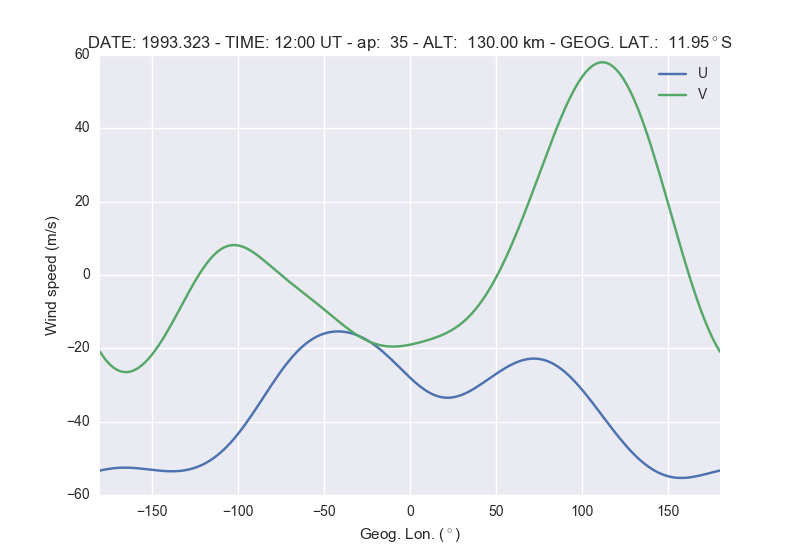
>>> from pyhwm2014 import HWM142D, HWM142DPlot
>>> hwm14Obj = HWM142D(altlim=[90,200], altstp=2, ap=[-1, 35],
        option=1, utlim=[0.,23.75], utstp=.25, verbose=False)
>>> hwm14Gbj = HWM142DPlot(profObj=hwm14Obj, zMin=[-75., -100], zMax=[75., 100.])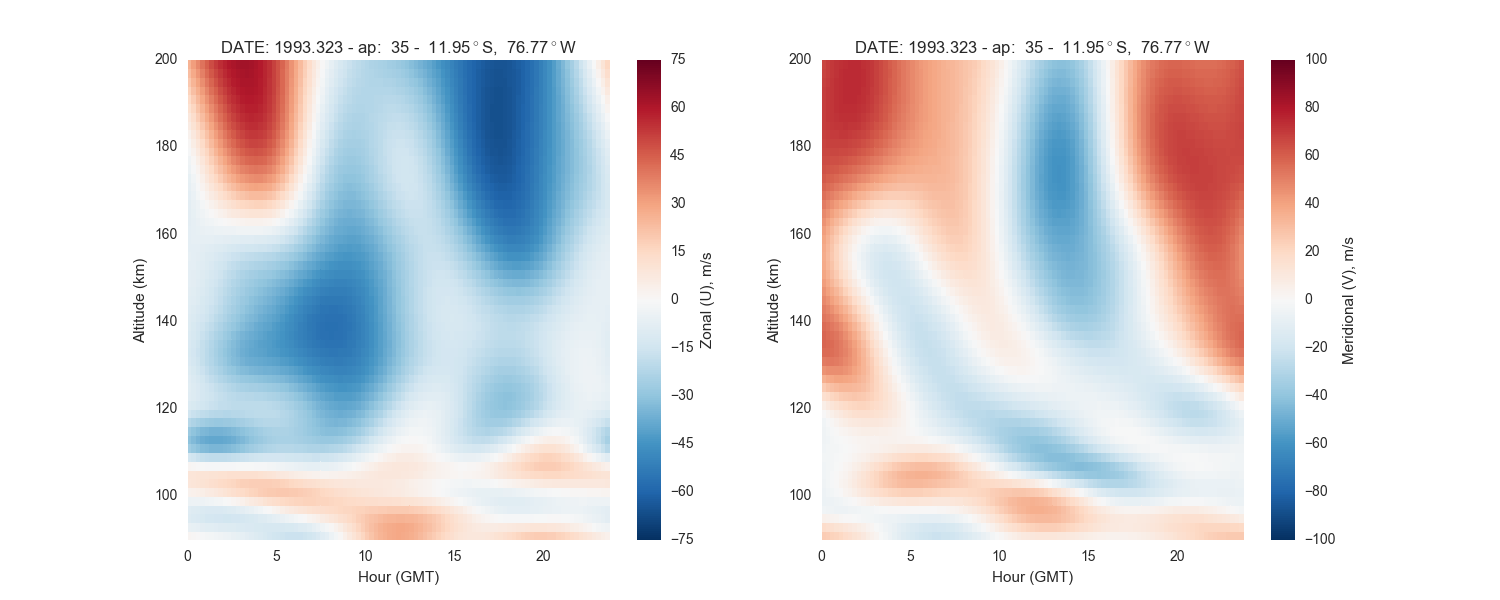
>>> from pyhwm2014 import HWM142D, HWM142DPlot
>>> hwm14Obj = HWM142D(altlim=[90., 200.], altstp=2., ap=[-1, 35],
        glatlim=[-90., 90.], glatstp=2., option=2, verbose=False, ut=12.)
>>> hwm14Gbj = HWM142DPlot(profObj=hwm14Obj, zMin=[-250., -100], zMax=[250., 100.])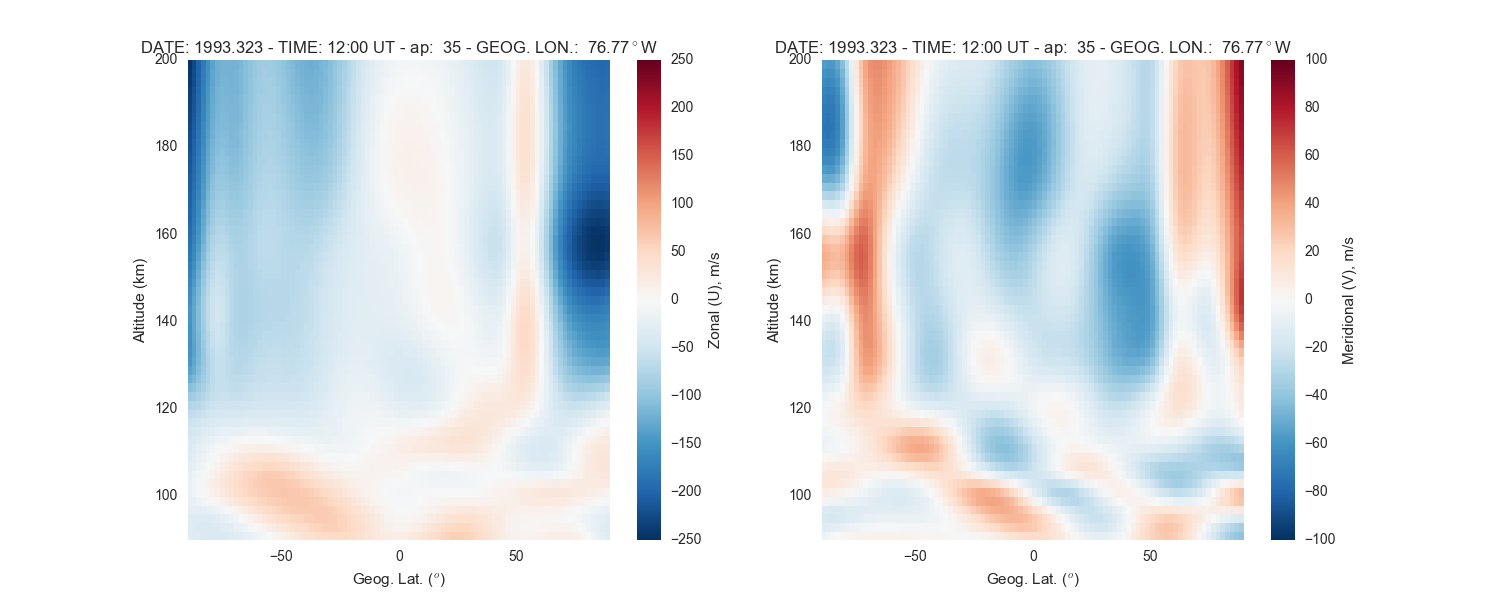
>>> from pyhwm2014 import HWM142D, HWM142DPlot
>>> hwm14Obj = HWM142D(altlim=[90., 200.], altstp=1., ap=[-1, 35],
        glonlim=[-90., 90.], glonstp=2., option=4, ut=12., verbose=False)
>>> hwm14Gbj = HWM142DPlot(profObj=hwm14Obj, zMin=[-100., -100], zMax=[100., 100.])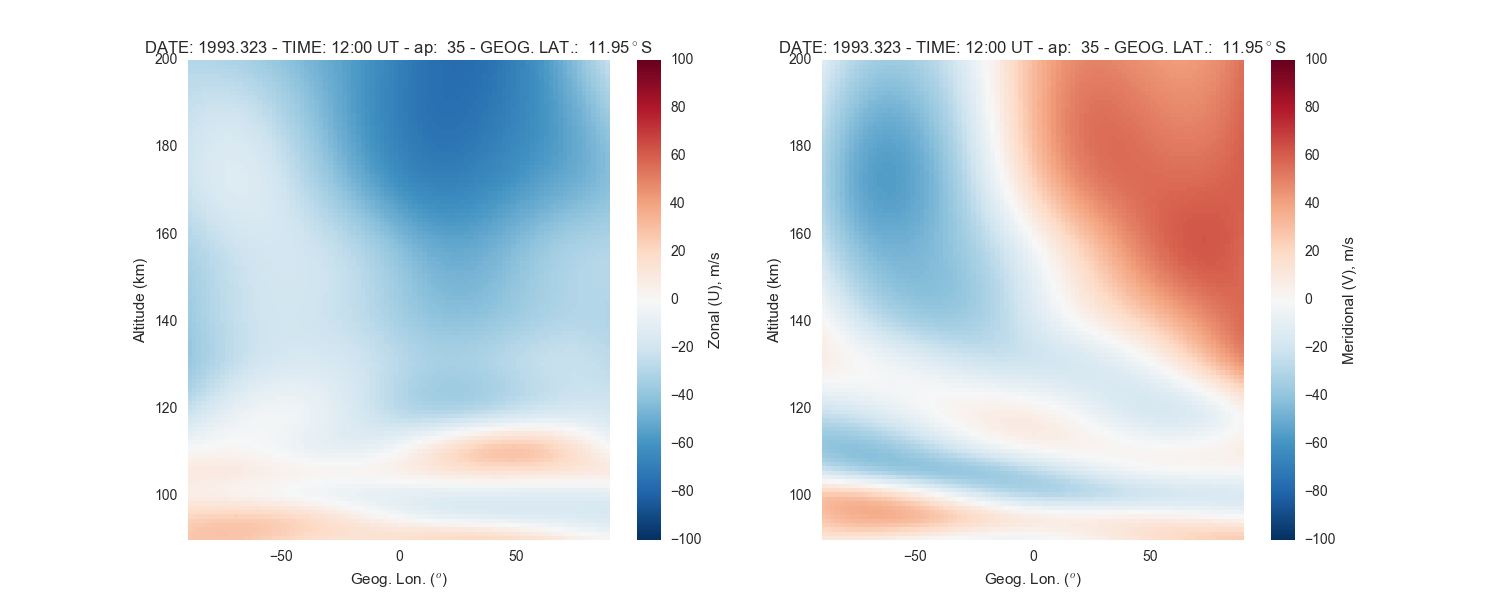
>>> from pyhwm2014 import HWM142D, HWM142DPlot
>>> hwm14Obj = HWM142D(alt=130., ap=[-1, 35], glatlim=[-90., 90.],
        glatstp=1., glonlim=[-180., 180.], glonstp=2., option=6, verbose=False)
>>> hwm14Gbj = HWM142DPlot(profObj=hwm14Obj, zMin=[-150., -150], zMax=[150., 150.])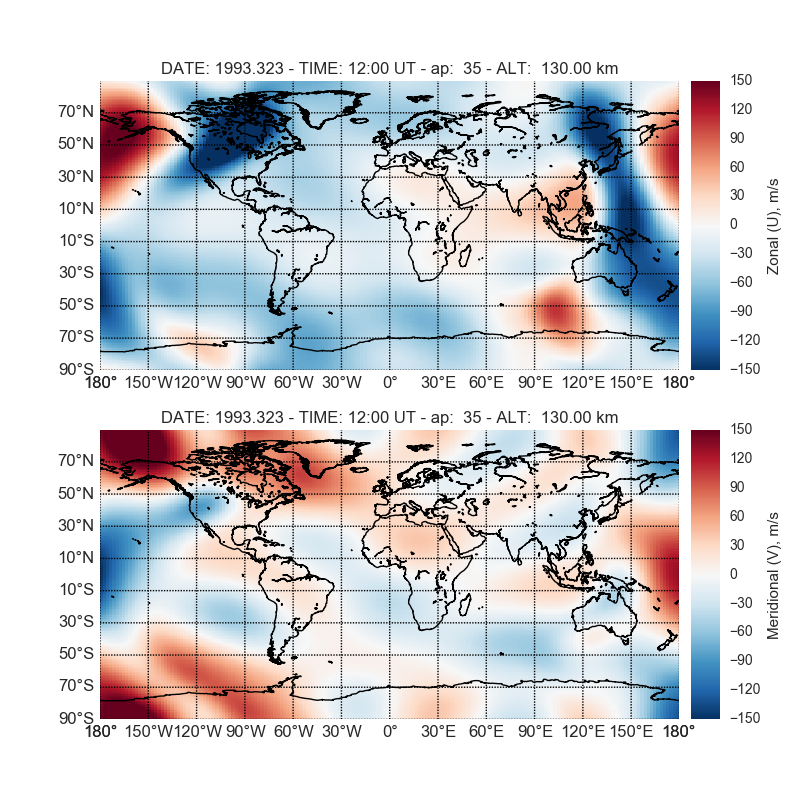
>>> from pyhwm2014 import HWM142D, HWM142DPlot
>>> hwm14Obj = HWM142D(alt=400., ap=[-1, 35], glatlim=[-90., 90.], glatstp=10.,
        glonlim=[-180., 180.], glonstp=20., option=6, verbose=False)
>>> hwm14Gbj = HWM142DPlot( profObj=hwm14Obj, WF=True, zMin=[-150., -150],
        zMax=[150., 150.] )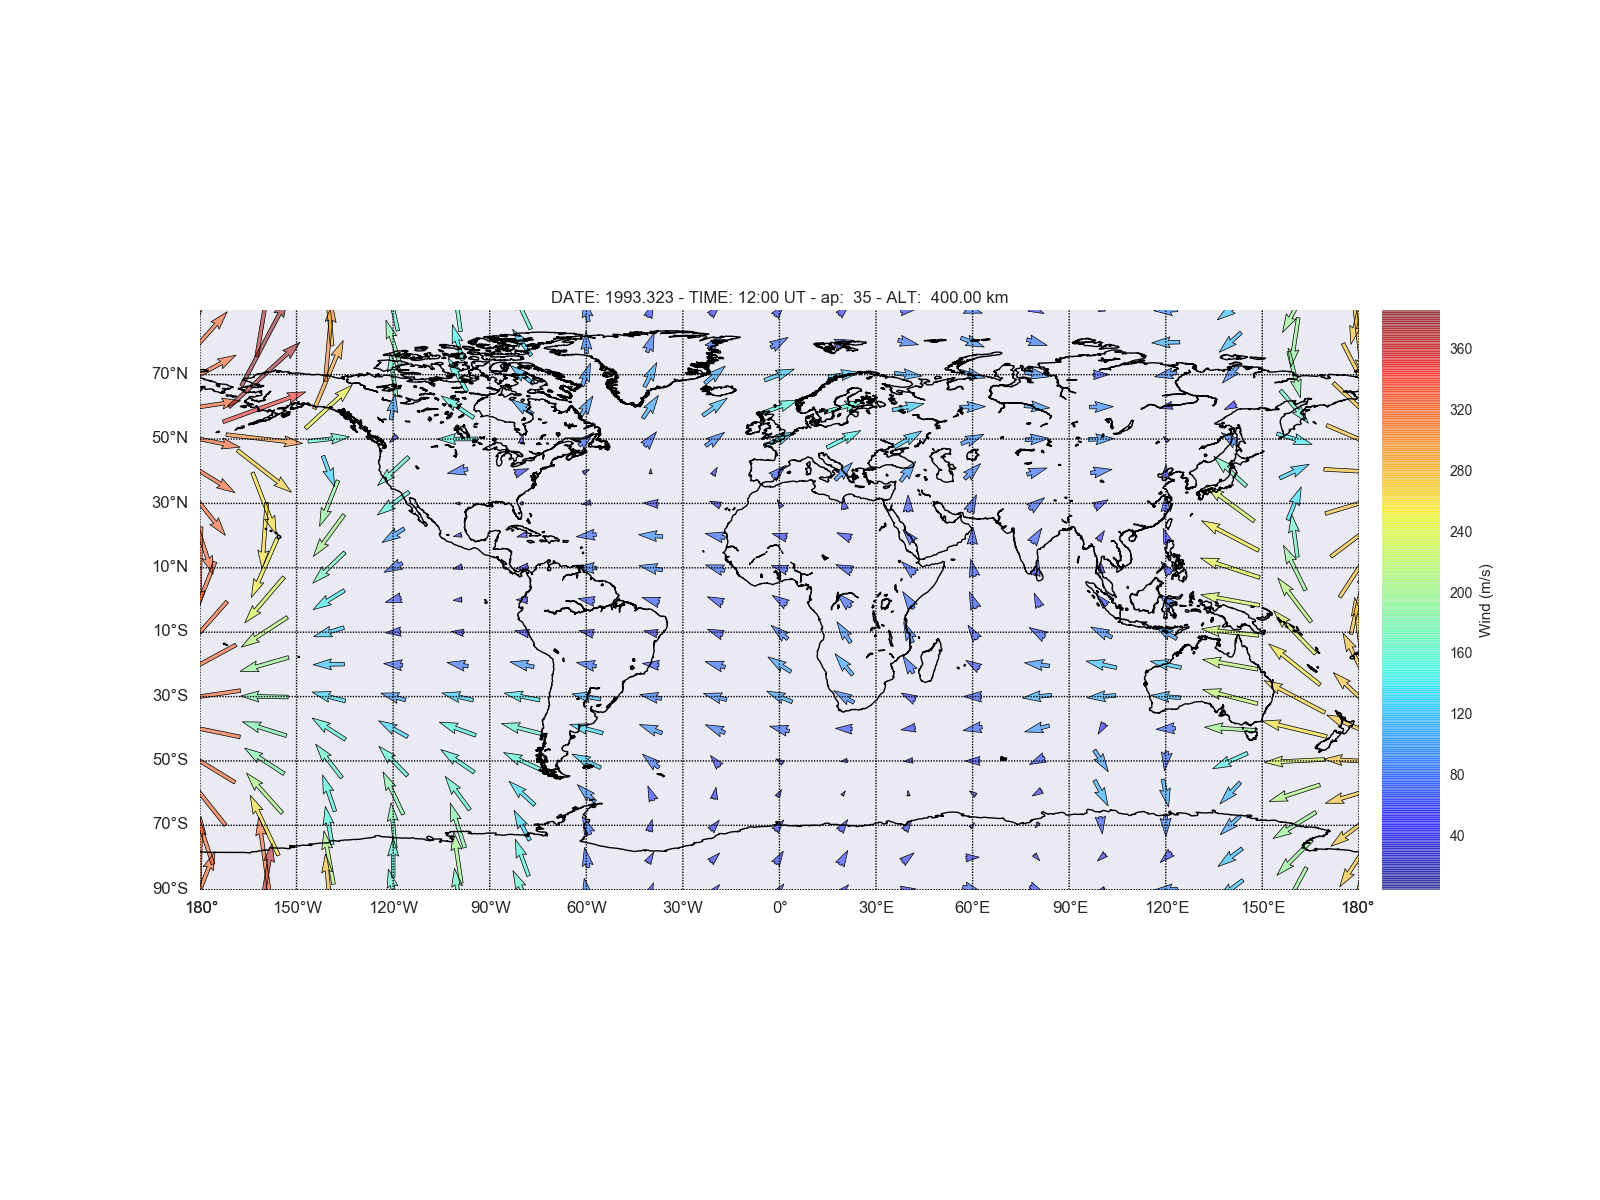
| [1] | Peterson, P. "F2PY: Fortran to Python interface generator" |
| [2] | Drob, D. P. et al. "An update to the Horizontal Wind Model (HWM): The quiet time thermosphere", Earth and Space Science, 2015 |
The Fortran extension is automatically built using CMake + f2py (Meson backend) during installation:
$ make install313-sciThis automatically invokes the build system defined in pyproject.toml and CMakeLists.txt. No manual compilation steps are needed.
For Python 3.11 or earlier support, use git tag v1.1.0.