
psygreg's custom built Bazzite-based system. Niri with Noctalia setup, including noctalia-greeter, and rechunked, so it's lightweight and clean, without other desktop leftovers. Comes with all applicable optimization patches from LinuxToys on top of Bazzite's out-of-the-box, and replaces Bazaar and Bold Brew with LinuxToys for app and package management.
Choose one of the available variants:
gregos: for AMD and Intel graphics cards and integrated graphicsgregos-nvidia: for Nvidia Maxwell/Pascal (GT/X 9xx/10xx), GTX 750 and 750Ti series cardsgregos-nvidia-open: for Nvidia Turing (GTX 16xx and RTX 20xx) series and newer cards
To install it, from any running bootc-based Fedora immutable system (recommended Bazzite):
sudo bootc switch ghcr.io/psygreg/<variant>:latestThen, after a reboot, switch to the signed version of the image:
sudo bootc switch --enforce-container-sigpolicy ghcr.io/psygreg/<variant>:latestThen run the quick post-install setup steps by simply launching LinuxToys and following any prompts that show up from it. It will perform all necessary final touch-ups at first launch.
This image is based on ghcr.io/ublue-os/bazzite:stable and replaces the traditional desktop
environment with a tiling-compositor setup:
- niri - scrollable-tiling Wayland compositor (Fedora package) and all fixes and tweaks needed for it to work as you would expect.
- Noctalia - the desktop shell layered on top of niri: bar, launcher, control center, notifications, lock screen, wallpaper, OSDs, clipboard, tray, and its own polkit agent.
- Noctalia Greeter + greetd - the login screen.
Sourced from the Terra repository; the repo is used at build time and left disabled
afterwards, matching how Bazzite itself consumes Terra. The greeter runs as the
greetersystem account (declared viasystem_files/usr/lib/sysusers.d/gregos-niri.conf, withvideo/input/renderdevice access). greetd launches it through gregOS's ownnoctalia-greeter-renderwrapper, which makes the greeter's bundled wlroots compositor start reliably on any GPU — see Why a render wrapper. A setup service (gregos-noctalia-greeter-setup.service) verifies device access and initializes Noctalia's persistent state before greetd starts. - GTK theming -
adw-gtk3-theme(Fedora repos) applied withnwg-look(Terra), the GTK look-and-feel editor for Wayland; Qt apps are themed withqt6ct. - KDE Plasma and GNOME desktop environments are removed at build time, along with most of their
desktop-specific applications (see
REMOVE_PATTERNSin build_files/build.sh). Everything else Bazzite ships is untouched: Steam, gamescope, drivers, ujust, Bazzite Portal, Waydroid, Cockpit, the audio stack, and so on. Bazaar and Bold Brew are removed as well — software and system management is centered on LinuxToys instead. - Selected cross-desktop apps — Nautilus (
nautilus), GNOME Keyring (gnome-keyringwith itsgnome-keyring-pamgreetd integration andseahorseto manage it), GNOME Disks (gnome-disk-utility), Showtime (showtime), and KDE Connect (kde-connect). Nautilus thumbnails images via theglycin-loadersthumbnailers shipped by the base image (kept through the desktop cleanup) and videos viaffmpegthumbnailer. - Heroic Games Launcher instead of Lutris — Lutris is removed; Heroic
is installed at build time from the
.rpmasset of its latest GitHub release — so every image build automatically picks up the newest version. latencydevillauncher wrapper — the low-latency helper for competitive gaming is built in and installed on the systemPATH(/usr/bin/latencydevil, fetched at build time from its latest GitHub release, so image builds automatically pick up new versions). Prefix any game withlatencydevil -- %command%in Steam launch options — or any terminal or Flatpak command withlatencydevil -- …— to inject GPU-aware low-latency environment variables in front of it; the wrapperexecs into the game, leaving nothing extra in the process tree. Runlatencydevil --printto see the variables it would apply on this system.- LinuxToys is layered on top, installed at build time from the
.rpmasset of its latest GitHub release — so every image build automatically picks up the newest version. It replaces Bazaar and Bold Brew as the image's software and system manager. Its well-known optimization tweaks are also baked into the image. - zswap instead of zram — the
zram-generatorpackages are removed. Swapped pages are compressed by the kernel withzstdinto azsmallocpool capped at 25% of RAM (with the shrinker enabled), backed by whatever swap device you provide yourself. See Swap: zswap instead of zram. - Snap packages (snapd) —
snapd,snapd-selinuxandsquashfuseare built in, with the immutable system adaptations described in Snap packages. Strictly confined and classic-confined snaps both work out of the box. - FlatPark pre-enabled — the FlatPark community Flatpak hub ships as a system
remote for every user (
system_files/etc/flatpak/remotes.d/flatpark.flatpakrepo, the same file-based mechanism the base image uses to pre-enable Flathub). - Simpler printer configuration through
system-config-printer. - Friendlier terminal shell and several
zshfeatures while remaining onbashwith a fully implemented sloth-bash - another project of mine.
Configuration lives in dotfiles/. The Niri files are installed under /etc/niri/; the package's
/usr/share/niri/defaults/config.kdl becomes a small wrapper that includes the system config. The
wrapper is copied into /etc/skel for new accounts and seeded into existing homes by the boot service.
Noctalia's TOML defaults are seeded only when a user has no existing copy.
/etc/skel/.config/ covers new accounts. gregos-niri-config-seed.service handles existing homes on rebase:
it adds missing defaults and migrates the old Niri config only when both it and its Noctalia include still
match the shipped files, leaving user edits untouched.
-
The
dotfiles/niri/config.kdlcontains the recommended niri settings from the Noctalia niri guide: rounded corners, Noctalia IPC keybinds (Mod+Spacelauncher,Mod+Pcontrol center,Mod+Commasettings,Alt+Tabwindow switcher), volume/brightness keys, screenshot binds, and thenoctalia-backdroplayer rule. -
Displays are detected at login.
gregos-niri-display-setup(started byspawn-at-startup) asks niri for each output's modes and sets it to its native resolution at the highest refresh rate it supports, so a 144 Hz monitor runs at 144 Hz without any configuration. Every connected output is handled this way, so multi-monitor setups work too. The result is written to~/.config/niri/gregos-display.kdl, which is regenerated on every login and only rewritten when it changes. To override a display, declareoutput "NAME" { mode "WIDTHxHEIGHT@REFRESH"; }in your~/.config/niri/config.kdl; the setup script leaves that output alone. -
The Noctalia settings window opens floating at a proportion of the screen it appears on (1080x920 on a 2560x1440 display), so it is correctly sized at any resolution and on any display of a multi-monitor setup. To change its size, add a
window-rulebelow theincludeline in yourconfig.kdl. -
Noctalia starts automatically with the session (
spawn-at-startup "noctalia"). -
Portals:
xdg-desktop-portal-gtk+xdg-desktop-portal-gnome(niri's screencast path), per niri/Noctalia recommendations. Xwayland apps run throughxwayland-satellite, which is a dependency of the Fedora niri package. -
Qt apps use
qt6ct, and GTK apps can be themed withnwg-look+adw-gtk3-theme(runnwg-lookonce to apply). The cursor theme is Adwaita (adwaita-cursor-theme), since the DMZ cursor themes referenced in earlier iterations are no longer packaged in Fedora. -
The greeter remembers the last session and user picked; niri is the default session. Noctalia's settings app (
Mod+Comma) manages the shell, and its polkit agent is pre-enabled via~/.config/noctalia/10-gregos-defaults.toml. -
Dead keys (compose/accented characters) work consistently in all apps (GTK2/3/4 and Qt) with layouts like
us-intl, through ibus. Since GTK 4.20 (GNOME 49+), GTK no longer handles dead-key and X11-style compose sequences itself on Wayland — it delegates to an input-method framework, and Qt's Wayland text-input path likewise does no composing. Without a running input method, layouts likeus-intltype accents that never appear, and toolkit-builtin workarounds (GTK_IM_MODULE=simple,QT_IM_MODULE=compose) behave inconsistently across apps. The image ships the full ibus stack (ibus,ibus-gtk3,ibus-gtk4, plus Qt's ibus plugin fromqt6-qtbase-gui) and the niri session startsibus-daemon -drxand exportsGTK_IM_MODULE=ibus,QT_IM_MODULE=ibus,XMODIFIERS=@im=ibus, so every toolkit composes through ibus. The ibus keyboard engine for this layout (xkb:us:intl) is preloaded as a dconf system default, so dead keys work with no first-run setup. Engines/config is atibus-setup.Apps launched through D-Bus/systemd activation (the GNOME apps, e.g. the Text Editor opened via "Open with…" in the file manager) are spawned by the systemd user manager instead of the session, with the manager's environment rather than the caller's, so the niri session variables above never reached them and they loaded no ibus module. The image therefore also ships the same variables as an
environment.ddrop-in (/usr/lib/environment.d/10-gregos-ibus.conf), which the user manager reads at startup: apps launched that way get the same IM environment and compose identically. One rule to keep in mind: an ibus keyboard engine mirrors its own layout. With the preloadedxkb:us:intlengine, accents match aus-intlXKB layout set in niri (input { keyboard { xkb { layout … } } }); if niri's layout says something else, set the matching ibus keyboard engine inibus-setup(or change the engine). This is also why the shipped niri config leaves the layout unset: it is a per-user choice. -
Full input-method (IME) input is ready out of the box. The engine set for the locales that need real IME is pre-installed — Japanese (
ibus-anthy), Simplified Chinese (ibus-libpinyin), Traditional Chinese (ibus-chewing, plusxkb:us…Bopomofo alternatives), Korean (ibus-hangul), Thai and the wider catalogue throughibus-m17n, and the predictiveibus-typing-booster(emoji/unicode). The IME engines sit inactive next to the preloaded keyboard engine: plain Latin/dead-key input keeps working for everyone until the user adds an IME — openibus-setup, add the wanted engine (e.g. "Anthy" or "Intelligent Pinyin"), and switch engines with the default toggle (usuallyCtrl+Space). Flatpak support is automatic: the image ships a system-wide override (/etc/flatpak/overrides/global) that injects the same IM environment into every Flatpak. It only selects which input-context module the toolkits load, and how much it helps depends on the app's runtime — the ibus module has to be inside the sandbox, and runtimes differ: the GNOME runtime ships it for GTK3 and GTK4, the freedesktop runtime only for GTK3. So GTK4 apps on the freedesktop runtime, and Qt apps in general, have no ibus module to load and get their default input handling back (a warning in the log, plain Latin input still fine). For such an app where dead keys specifically matter, override it alone with GTK's built-in composer, which is compiled into every GTK build:flatpak override --user --env=GTK_IM_MODULE=simple <app-id>. One known gap: Chromium/Electron apps need--enable-wayland-imeon their command line (e.g. via~/.config/chromium-flags.confor the app's own flags file) to take part in the Wayland input-method path. Note that existing homes with a user-modified niriconfig.kdlkeep that file, so those users need to apply the sameenvironmentandspawn-at-startupchanges by hand.
Mod is the Super (Windows) key. The bindings below are defined in dotfiles/niri/config.kdl.
Shell and launchers
| Shortcut | Action |
|---|---|
Mod+Space |
Noctalia app launcher |
Mod+P |
Noctalia control center |
Mod+Comma |
Noctalia settings |
Mod+T |
Open terminal (BlackBox) |
Alt+Tab / Mod+Tab |
Window switcher (hold to browse) |
Windows and columns
| Shortcut | Action |
|---|---|
Mod+A / Mod+D |
Focus column left / right |
Mod+W / Mod+S |
Focus window, or workspace, up / down |
Mod+Shift+A / Mod+Shift+D |
Move column left / right |
Mod+Shift+W / Mod+Shift+S |
Move window to workspace up / down |
Mod+F |
Maximize column |
Mod+F11 |
Fullscreen window |
Mod+V |
Toggle floating mode for focused window |
Mod+C |
Center focused window on display |
Mod+Q |
Close window |
Mouse wheel
| Shortcut | Action |
|---|---|
Mod + wheel up / down |
Focus workspace up / down |
Mod+Alt + wheel up / down |
Focus column left / right |
Mod+Shift + wheel up / down |
Volume up / down |
Screenshots
| Shortcut | Action |
|---|---|
Print |
Region screenshot (Noctalia) |
Mod+Print |
Window screenshot (niri built-in: clipboard and ~/Pictures/Screenshots) |
Media and brightness (these also work on the lock screen)
| Key | Action |
|---|---|
| Volume up / down / mute | Noctalia volume and mute |
| Brightness up / down | Noctalia brightness |
The mouse-wheel binds use a 150 ms cooldown so one scroll step doesn't move several places at once.
Applications such as Zed keep their tokens in the freedesktop Secret Service (libsecret), so two things
have to hold for them to stay quiet: org.freedesktop.secrets must be served by GNOME Keyring, and
the daemon serving it has to be the one that got your login password — the one pam_gnome_keyring starts
and unlocks while the greetd PAM session runs.
On a stock image that second part breaks, and it breaks the way you described: the login is typed, then later an app asks for a keyring password anyway. The sequence is:
pam_gnome_keyringstartsgnome-keyring-daemon --daemonizeand unlocks the login keyring. That daemon is an unsupervised child of the PAM session — the packagedgnome-keyring-daemon.serviceis disabled — so when it exits, the unlock state goes with it and nothing brings it back.- The next app touches the Secret Service, which D-Bus-activates
org.freedesktop.secretsand starts a fresh daemon with no password. A new daemon cannot know your login password, so the login keyring stays locked and every app that needs a secret prompts for one.
The daemon also crashes outright in that path (gkd_secret_service_get_pkcs11_session: assertion 'client' failed, aes_negotiate: assertion 'session' failed, SIGABRT), which is what kills the first daemon in
the middle of a session. Fedora ships gnome-keyring 50.x; upstream 51.0 contains fixes for exactly these
crashes.
gregOS therefore runs the keyring as a supervised session service:
gnome-keyring-daemon.socketis enabled for the user session (image-pinned inbuild_files/build.sh). The daemon then runs under the systemd user manager with--control-directory=%t/keyringandRestart=on-failure, so a crash brings it back instead of leaving a dead control socket and a locked keyring behind.gcr3is pinned forgcr-prompter, the dialog gnome-keyring uses when a prompt really is needed. (Fedora ships the gcr-3 prompter asgcr3;gcr4does not provide it.)seahorseis installed as the keyring's management UI — the place to inspect theloginkeyring, change its password, or fix a wrong one.
The Noctalia Greeter is not just a UI — it ships its own bundled wlroots
compositor that draws the login screen. wlroots picks a renderer with wlr_renderer_autocreate(), which
tries them in this order:
gles2(EGL / DRI2)vulkan(needs the DRM↔Vulkan device match to succeed)pixman(software) — only used when the backend has no render node
The catch is step 3: on real hardware there is a render node, so if gles2 and vulkan both fail,
wlroots returns NULL instead of falling back to software, the compositor prints
failed to create wlroots renderer and exits, and greetd restart-loops onto a blank screen with no useful
error. That is exactly what happened on this Bazzite base (EGL: DRI2: failed to create screen, then
Vulkan: Could not match drm and vulkan device).
A login greeter must never be able to fail to draw. So greetd does not run noctalia-greeter-session
directly — it runs gregOS's noctalia-greeter-render wrapper
(system_files/usr/libexec/gregos/noctalia-greeter-render), which:
- first lets wlroots pick a hardware renderer (
auto→gles2/vulkan/pixman); - if the compositor cannot get through startup (renderer creation fails immediately), retries pinned to the
software
pixmanrenderer, which always works regardless of GPU, driver, or render-node quirks; - treats a compositor that survives a short grace period as healthy and simply waits for it.
The desktop session you log into afterwards is unaffected — niri (via smithay) does its own renderer
selection and uses hardware acceleration. The wrapper only guarantees that the login screen always
appears. It can be tuned or pinned for debugging through environment variables documented at the top of the
wrapper (e.g. GREGOS_GREETER_RENDERER=gles2 to force hardware, or GREGOS_GREETER_MAX_ATTEMPTS).
zram swaps can be great if you have a large amount of RAM available and won't typically put it under pressure, otherwise, end up causing unwanted out-of-memory events - while those won't freeze the system, instead just crashing whatever process was the memory hog, it's clearly desirable to avoid them as much as possible, hence why the choice for zswap.
Bazzite's swap-on-zram (zram-generator) is removed. Swapped pages are compressed by the kernel's
zswap with zstd into a zsmalloc pool of up to 25% of
RAM (shrinker enabled), spilling over to whatever swap device is present.
The configuration ships in two independent places so it applies on every path:
/usr/lib/bootc/kargs.d/20-gregos-zswap.toml— kernel command line arguments, applied by bootc when it creates this image's deployment.gregos-zswap-setup.service— mirrors any parameter not already set on the kernel command line to/sys/kernel/zswapearly at boot. If you set your ownzswap.*=arguments, those win and the service skips them.
No swap device ships with the image: create your own swap file or partition (see
the Bazzite swapfile guide); zswap compresses in front of it
either way. The live state is visible (and tunable) under /sys/kernel/zswap/, e.g.
cat /sys/kernel/zswap/current_pool_size.
snapd is layered on top of Bazzite so snaps can be used alongside Flatpaks, Homebrew and the RPM
base. On an immutable bootc/ostree system a plain dnf install snapd is not enough, so the image handles
the immutable-specific parts at build time:
snapd,snapd-selinuxandsquashfuse(build_files/build.sh).snapd-selinuxships thesnappySELinux policy module and the file contexts for/var/lib/snapd,/var/snapand the snapd binaries — required because Bazzite runs SELinux in enforcing mode.squashfuseis the fallback for mounting.snapsquashfs images whenever thesquashfskernel module is not available (snapd itself requires((squashfuse and fuse) or kmod(squashfs.ko)))./snap -> var/lib/snapd/snap, created in the image. snapd accepts exactly two layouts for its mount directory (dirs.SupportsClassicConfinementin the snapd source):/snapas a real directory (the Ubuntu default) or/snapas a symlink to/var/lib/snapd/snap(the Fedora/Arch convention). Fedora'ssnapduses the second layout and deliberately does not ship the link — on a mutable Fedora you create it yourself withsudo ln -s /var/lib/snapd/snap /snap. On this image the root filesystem is read-only, so the link is baked into the image instead (relative target, so it resolves the same in the build container, in the image, and on every deployed system). Without it, strictly confined snaps still run, but classic snaps are refused with "classic confinement requires snaps under /snap or symlink from /snap to /var/lib/snapd/snap".- snapd's runtime state under
/var(system_files/usr/lib/tmpfiles.d/gregos-snapd.conf). The RPM ships those directories, but the image's/varcontent is not carried onto deployed hosts (ostree keeps the host's/varand only seeds it at first install), andbootc container lintwarns about image/varcontent without matching tmpfiles.d entries. The tmpfiles snippet recreates the whole tree on every boot. var-lib-snapd-snap.mountandvar-snap.mount(system_files/usr/lib/systemd/system/), enabled in the image. Upstream snapd ships these self-bindrbind,private,sharedmount units; Fedora's package drops them along with the/snapsymlink. They make the snap mount directories mount points with shared mount propagation, which snapd needs for snap refreshes (LP: #1668759) and for parallel-installed classic snaps. Their upstreamConditions skip them when snapd has already preserved a mount namespace, so enabling them unconditionally is safe.snapd.socketis enabled (socket activation), matching Fedora defaults —snapd.serviceitself is started on first use.
snap version                      # snapd should answer after the first invocation
snap find vlc
snap install vlc                  # strictly confined snap
snap install code --classic       # classic snap - needs the /snap link, which the image ships
The first snap invocation may take a few seconds while snapd seeds the device
(sudo snap wait system seed.loaded waits for it explicitly). Desktop entries of installed snaps land in
/var/lib/snapd/desktop, which is already added to XDG_DATA_DIRS by snapd's own environment.d and
profile.d snippets, so they appear in the Noctalia launcher after a re-login.
- Confinement is weaker than on Ubuntu. Fedora has no AppArmor, so snaps run without AppArmor confinement (seccomp and the per-snap mount namespaces still apply). This is a Fedora-wide property of snapd, not something this image changes.
- Classic snaps see the host filesystem, as everywhere — they are unconfined by design.
- Home directories must be under
/home(they are on this image:/homeis/var/home), since snapd requires$HOMEto live under/home. - Snap refreshes and installs update
/var/lib/snapd, never/usr, so they survive image updates and rollbacks untouched.
gpg 2.4.1 and newer write ~/.gnupg/common.conf with an active use-keyboxd the first time they run without an existing ~/.gnupg directory. That moves public keys into keyboxd's own database instead of pubring.kbx, and distroboxes, which share $HOME with the host, could not verify signing keys from it. gregOS ships #use-keyboxd as the content of common.conf instead, so gpg keeps the classic keyring:
/etc/skel/.gnupg/common.confcovers new accounts.gregos-gnupg-config-seed.servicecovers existing homes, for root and every regular user, on every boot. It creates a missingcommon.confand comments out an activeuse-keyboxdline in an existing one. The rest of the file is left alone. Because it runs on every boot, keyboxd cannot stay enabled throughcommon.confon this image.
If you keep keys in keyboxd's database (~/.gnupg/public-keys.d/pubring.db), gpg cannot see them once keyboxd is disabled, and it does not migrate them. Export them while use-keyboxd is still enabled, then import the file with it disabled. On an image that already disabled it, uncomment the line only for the export:
gpg --export --export-options backup > all-keys.gpg    # use-keyboxd enabled
gpg --import --import-options restore < all-keys.gpg # use-keyboxd disabledThis repository is meant to be a template for building your own custom bootc image. This template is the recommended way to make customizations to any image published by the Universal Blue Project.
If you have questions about this template after following the instructions, try the following spaces:
- Universal Blue Forums
- Universal Blue Discord
- bootc discussion forums - This is not an Universal Blue managed space, but is an excellent resource if you run into issues with building bootc images.
To get started on your first bootc image, simply read and follow the steps in the next few headings. If you prefer instructions in video form, TesterTech created an excellent tutorial, embedded below.

These steps assume you have the following:
- A Github Account
- A machine running a bootc image (e.g. Bazzite, Bluefin, Aurora, or Fedora Atomic)
- Experience installing and using CLI programs
Select Use this Template on this page. You can set the name and description of your repository to whatever you would like, but all other settings should be left untouched.
Once you have finished copying the template, you need to enable the Github Actions workflows for your new repository.
To enable the workflows, go to the Actions tab of the new repository and click the button to enable workflows.
Here I will defer to the much superior GitHub documentation on the matter. You can use whichever method is easiest. GitHub Documentation
Once you have the repository on your local drive, proceed to the next step.
Container signing is important for end-user security and is enabled on all Universal Blue images. By default the image builds will fail if you don't.
First, install the cosign CLI tool With the cosign tool installed, run inside your repo folder:
COSIGN_PASSWORD="" cosign generate-key-pairThe signing key will be used in GitHub Actions and will not work if it is password protected.
Warning
Be careful to never accidentally commit cosign.key into your git repo. If this key goes out to the public, the security of your repository is compromised.
Next, you need to add the key to GitHub. This makes use of GitHub's secret signing system.
Using the Github Web Interface (preferred)
Go to your repository settings, under Secrets and Variables -> Actions
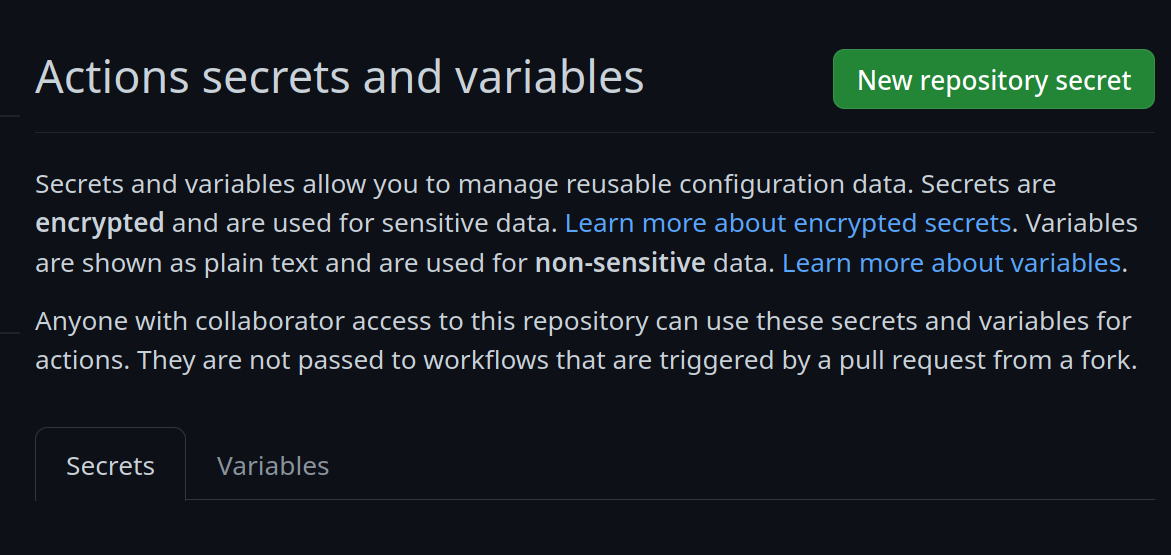 Add a new secret and name it
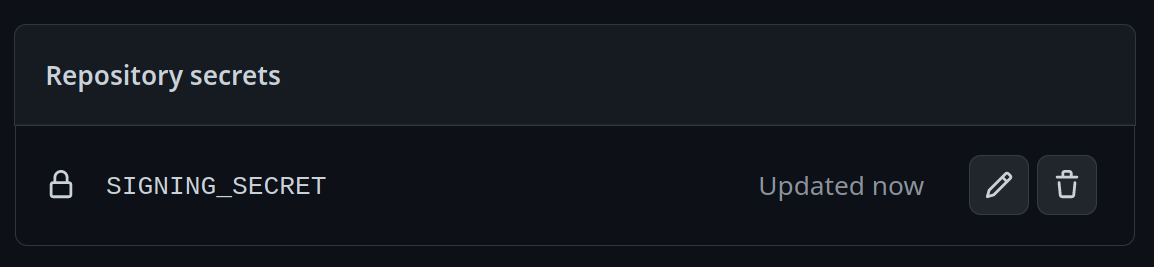
SIGNING_SECRET, then paste the contents of cosign.key into the secret and save it. Make sure it's the .key file and not the .pub file. Once done, it should look like this:
Using the Github CLI
If you have the github-cli installed, run:
gh secret set SIGNING_SECRET < cosign.keyTo choose a base image, simply modify the line in the container file starting with FROM. This will be the image your image derives from, and is your starting point for modifications.
For a base image, you can choose any of the Universal Blue images or start from a Fedora Atomic system. Below this paragraph is a dropdown with a non-exhaustive list of potential base images.
Besides the standard image, this repository also builds two NVIDIA variants from Bazzite's NVIDIA bases, published alongside it by the build.yml workflow matrix:
ghcr.io/psygreg/gregos-nvidia:stable— fromghcr.io/ublue-os/bazzite-nvidia:stable(proprietary driver)ghcr.io/psygreg/gregos-nvidia-open:stable— fromghcr.io/ublue-os/bazzite-nvidia-open:stable(open kernel modules)
Both use the same build procedure; when the base image name includes nvidia, build_files/build.sh swaps Mesa's MESA_SHADER_CACHE_MAX_SIZE default for the NVIDIA driver's __GL_SHADER_DISK_CACHE_SIZE and installs the "Limit Free Buffer Pool On Wayland Compositors" application profile for niri under /etc/nvidia/nvidia-application-profiles-rc.d/. The workflow sets IMAGE_NAME and BASE_IMAGE per matrix entry; for local builds, export BASE_IMAGE before calling just build, e.g. BASE_IMAGE=ghcr.io/ublue-os/bazzite-nvidia:stable just build gregos-nvidia latest.
Base Images
- Bazzite:
ghcr.io/ublue-os/bazzite:stable - Aurora:
ghcr.io/ublue-os/aurora:stable - Bluefin:
ghcr.io/ublue-os/bluefin:stable - Universal Blue Base:
ghcr.io/ublue-os/base-main:latest - Fedora:
quay.io/fedora/fedora-bootc:44
You can find more Universal Blue images on the packages page.
If you don't know which image to pick, choosing the one your system is currently on is the best bet for a smooth transition. To find out what image your system currently uses, run the following command:
sudo bootc statusThis will show you all the info you need to know about your current image. The image you are currently on is displayed after Booted image:. Paste that information after the FROM statement in the Containerfile to set it as your base image.
Change the IMAGE_NAME and REPO_ORGANIZATION variable inside the image-template.env
To commit and push all the files changed and added in step 2 into your Github repository:
git add Containerfile image-template.env cosign.pub
git commit -m "Initial Setup"
git push
Once pushed, go look at the Actions tab on your Github repository's page. The green checkmark should be showing on the top commit, which means your new image is ready!
From your bootc system, run the following command substituting in your Github username and image name where noted.
sudo bootc switch ghcr.io/<username>/<image_name>This should queue your image for the next reboot, which you can do immediately after the command finishes. You have officially set up your custom image! See the following section for an explanation of the important parts of the template for customization.
The Containerfile defines the operations used to customize the selected image.This file is the entrypoint for your image build, and works exactly like a regular podman Containerfile. For reference, please see the Podman Documentation.
The build.sh file is called from your Containerfile. It is the best place to install new packages or make any other customization to your system. There are customization examples contained within it for your perusal.
The build.yml Github Actions workflow creates your custom OCI image and publishes it to the Github Container Registry (GHCR). By default, the image name will match the Github repository name.
This template provides an out of the box workflow for creating disk images (ISO, qcow, raw) for your custom OCI image which can be used to directly install onto your machines.
This template provides a way to upload the disk images that is generated from the workflow to a S3 bucket. The disk images will also be available as an artifact from the job, if you wish to use an alternate provider. To upload to S3 we use rclone which is able to use many S3 providers.
The build-disk.yml Github Actions workflow creates a disk image from your OCI image by utilizing the bootc-image-builder. In order to use this workflow you must complete the following steps:
- Modify
disk_config/iso.tomlto point to your custom container image before generating an ISO image. - If you changed your image name from the default in
build.ymlthen in thebuild-disk.ymlfile edit theIMAGE_REGISTRY,IMAGE_NAMEandDEFAULT_TAGenvironment variables with the correct values. If you did not make changes, skip this step. - Finally, if you want to upload your disk images to S3 then you will need to add your S3 configuration to the repository's Action secrets. This can be found by going to your repository settings, under
Secrets and Variables->Actions. You will need to add the following
S3_PROVIDER- Must match one of the values from the supported listS3_BUCKET_NAME- Your unique bucket nameS3_ACCESS_KEY_ID- It is recommended that you make a separate key just for this workflowS3_SECRET_ACCESS_KEY- See above.S3_REGION- The region your bucket lives in. If you do not know then set this value toauto.S3_ENDPOINT- This value will be specific to the bucket as well.
Once the workflow is done, you'll find the disk images either in your S3 bucket or as part of the summary under Artifacts after the workflow is completed.
This template comes with the necessary tooling to index your image on artifacthub.io. Use the artifacthub-repo.yml file at the root to verify yourself as the publisher. This is important to you for a few reasons:
- The value of artifacthub is it's one place for people to index their custom images, and since we depend on each other to learn, it helps grow the community.
- You get to see your pet project listed with the other cool projects in Cloud Native.
- Since the site puts your README front and center, it's a good way to learn how to write a good README, learn some marketing, finding your audience, etc.
The Justfile contains various commands and configurations for building and managing container images and virtual machine images using Podman and other utilities. It is also used inside Github Actions.
Container build:
These are usually preinstalled on Universal Blue's Bootc Images.
Linting:
- shfmt
- shellcheck
These are all sourced from the image-template.env file.
image_name: The name of the image (default: "image-template").default_tag: The default tag for the image (default: "latest").bib_image: The Bootc Image Builder (BIB) image (default: "quay.io/centos-bootc/bootc-image-builder:latest").
All these recipes will work (with default values) without supplying any arguments to them, e.g. just build
Builds a container image using Podman.
just build $target_image $tagArguments:
$target_image: The tag you want to apply to the image (default:$image_name).$tag: The tag for the image (default:$default_tag).
We can flatten the layers of container images to make sure there isn't a single huge layer when your image gets published. This does not make your image faster to download, just provides better resumability.
Rechunks the existing Image with rpm-ostree
just ostree-rechunk $target_image $tagRechunks the existing Image with chunkah, this is probably gonna be the default here at some point, try it out, it's cool.
just rechunk $target_image $tagThe image has to be in the containers-storage owned by root, to be able to rebase to it, see the _rootful_load_image recipe.
sudo just build and sudo just ostree-rechunk builds directly as root and allows you to skip the transfer to the root containers-storage.
You can rebase to all the images that are in your containers-storage:
sudo podman image list --filter=label=containers.bootc=1
See man bootc switch for more info.
sudo bootc switch --transport containers-storage localhost/myimage:latest
and reboot your system!
The below commands all build QCOW2 images. To produce or use a different type of image, substitute in the command with that type in the place of qcow2. The available types are qcow2, iso, and raw.
Builds a QCOW2 virtual machine image.
just build-qcow2 $target_image $tagRebuilds a QCOW2 virtual machine image.
just rebuild-vm $target_image $tagRuns a virtual machine from a QCOW2 image.
just run-vm-qcow2 $target_image $tagRuns a virtual machine using systemd-vmspawn.
just spawn-vm rebuild="0" type="qcow2" ram="6G"Checks the syntax of all .just files and the Justfile.
Fixes the syntax of all .just files and the Justfile.
Cleans the repository by removing build artifacts.
Runs shell check on all Bash scripts.
Runs shfmt on all Bash scripts.
For additional driver support, ublue maintains a set of scripts and container images available at ublue-akmod. These images include the necessary scripts to install multiple kernel drivers within the container (Nvidia, OpenRazer, Framework...). The documentation provides guidance on how to properly integrate these drivers into your container image.
These are images derived from this template (or similar enough to this template). Reference them when building your image!