EasyWP Debugger is a helper file that you can upload to the website root directory and open in a browser. It allows to debug and fix websites that otherwise would be impossible to fix (because of no access to file storage or database). It is built to help with websites hosted on EasyWP, but you can use it on other platforms as well.
There is a debugger file generator called debugger-generator.php. It allows to download debugger files with a random name (wp-admin-pretrxs, wp-admin-thwdsa, etc.) and password. In this guide, we use debugger.php as an example.
- Introduction
- How To Use
- Functionality
- Errors and issues that can be fixed via Debugger
- Backups and Restorations
- How to fix file system
- Repository structure and API
There are two ways to get a debugger file:
- Download directly from GitHub.
- Get using the debugger generator script.
If you use the first method, I recommend that you change the password at the start of the file right away (the PASSWORD constant).
Upload the file to the document root or wp-admin folder, log in with the password you set via the constant, and you will now see the following interface:
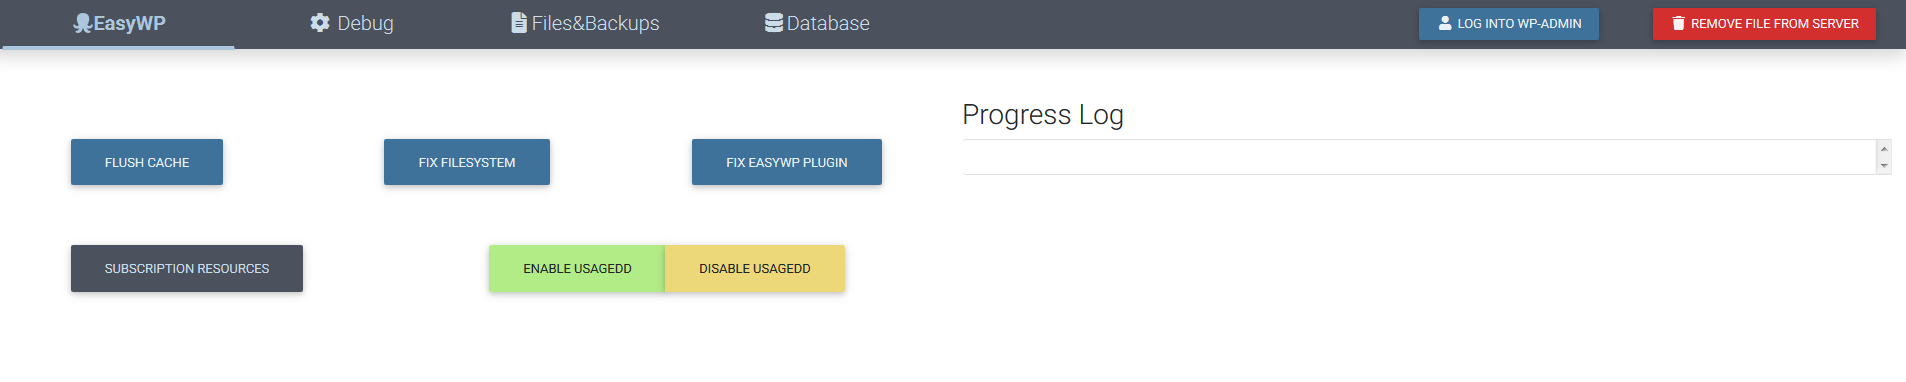
- You can switch between the Tabs to see the other tools you can use:

- When you click on the button, the result will always be shown in the Progress log field:
- You can always use additional buttons in the menu, no matter which tab you are on:

When you finish work in the Debugger, don't forget to remove it with the Remove File From Server button.
This tab is dedicated to the websites hosted on EasyWP and allows you to:
- Flush Cache flushes Varnish and Redis caches. Both caches have to be cleared for the website to show new content. It is especially useful if you just fixed an error (changed theme, disabled plugin) but the website doesn't go up;
- Fix Filesystem is rather outdated button. It was useful when EasyWP had frequent filesystem issues. Cases, when the issue can be connected to the filesystem errors, are described in this section;
- Fix EasyWP Plugin is used to fix the issues related to the EasyWP plugin: not working WP Admin button or absence of the Clear Cache button. More info on these cases are described here;
- Subscription Resources is there for EasyWP customer support to check subscription resources usage and can't be used by anyone else;
- Enable/Disable UsageDD simply installs and removes the UsageDD plugin. UsageDD allows you to find the possible reason for high resources usage refer to the "502/503/504 errors" section. The plugin can be installed from within WP Admin dashboard too.

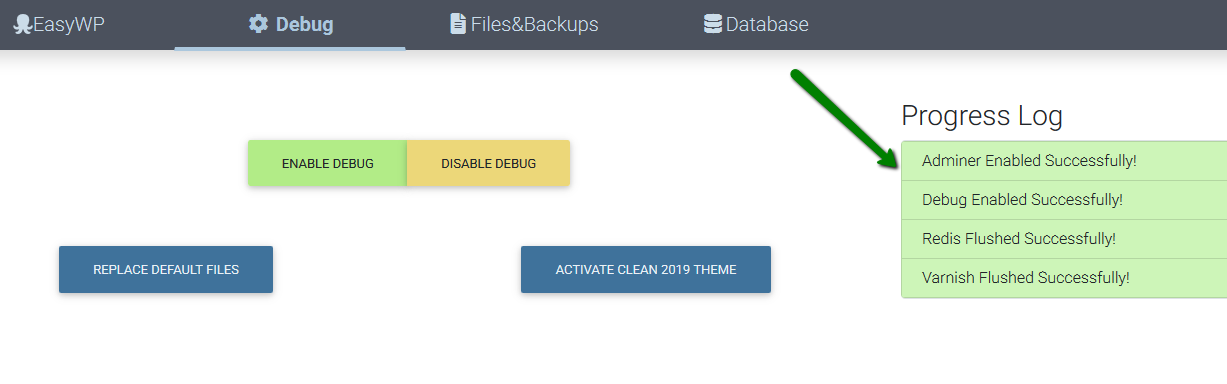
In this section you will have the following options:
- Enable/Disable Debug - set error_reporting to E_ALL and display_errors to 1. This will make the website show the full error instead of the "Technical Issues" banner;
- Replace Default Files replaces default files of WordPress with the files of the latest version. It is especially helpful when the error is about a missing default file. To clean hacked websites, additional steps are recommended;
- Activate Clean 2019 Theme uploads and activates the TwentyNineteen theme. It is useful when you want to set the default theme for testing purposes as well as for cleaning hacked websites. If there is already TwentyNineteen theme on the website, the button re-uploads the theme anyway.

If the debugger file is uploaded to the wp-admin folder, instead of the root directory of the website, the file path remains unchanged while working with the Files&Backups tab.
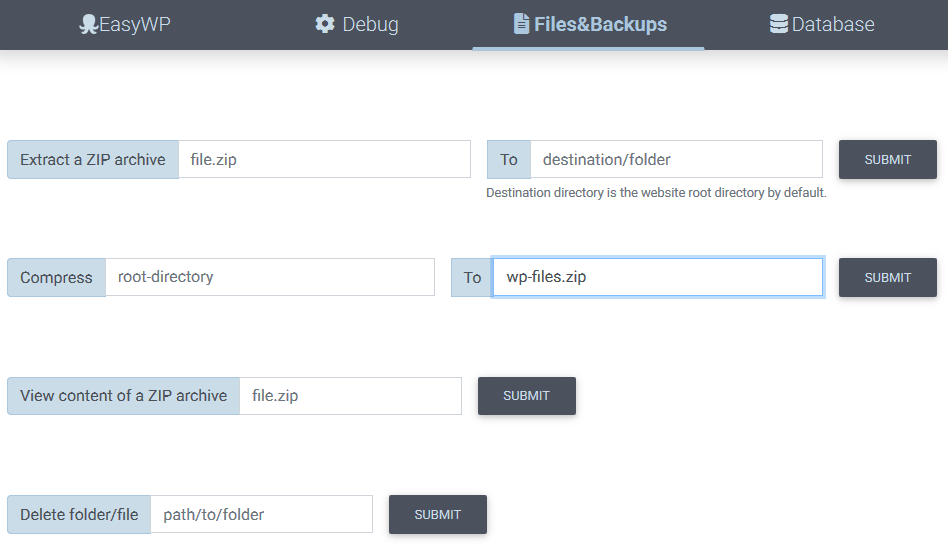
Here you will be able to:
- Extract a ZIP archive extracts a ZIP file of any size into the destination directory. If you leave the destination directory blank, the files will be extracted into the root directory of the website;
Tips
- Use the View content of a ZIP archive form to check if the archive will extract files right into the destination directory ( /file1.txt ) or the archive will extract the files into their own folder ( /wordpress/file1.txt ).
- If you extract WordPress files into the root directory, make sure to back up the wp-config.php file. You can download it or rename it to wp-config.php.bak.
- Compress form allows to compress a folder or file into a ZIP file. Files above 50 MB in size will not be included in the archive (large error_log files, other backups, etc.);
Tips
- If you start typing a folder name, it will appear in the destination field. If you want to leave the name of the backup by default (wp-files_.zip), copy the default archive name before entering the folder name.
- If you press Submit without filling any fields, the whole root directory will be compressed into a wp-files_.zip backup.
- View content of a ZIP archive: prints the list of files inside the archive to Progress Log;
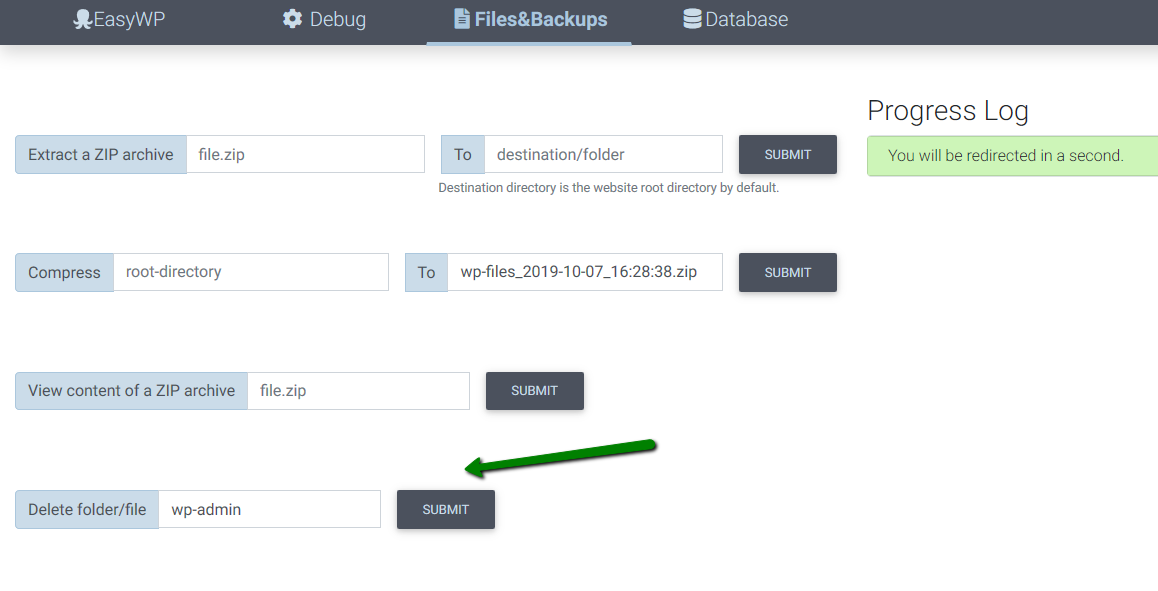
- Delete folder/file deletes the folder or file you will specify in this field. Simply enter the relative ( wp-content/cache ) or absolute ( /var/www/wptbox/wp-config.php ) path to remove such a folder/file. It is much faster than removing folders through FTP (removing a plugin folder via FTP can take up to 15-20 minutes):
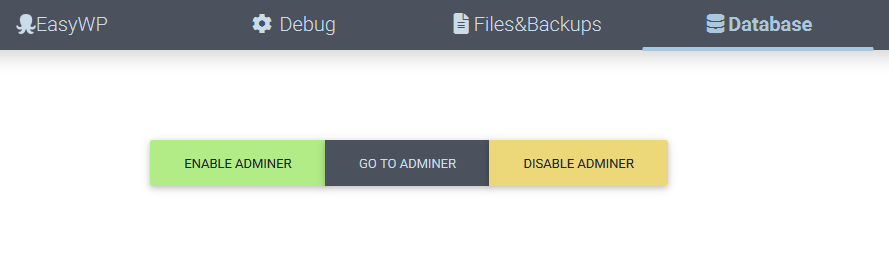
The Database tab allows you to:
- Enable Adminer: allows to access the website database in a PHPMyAdmin-like interface. Unlike the default PHPMyAdmin access on EasyWP, it doesn't have a query limit and thus allows to export and import databases. Follow this guide to import a database to the EasyWP website;
- Go To Adminer: press this button when Adminer is enabled, and you will get there once again;
- Disable Adminer: disables access to the database through Adminer.
Make sure to disable Adminer before you remove Debugger.
If the website shows a blank screen, it doesn't necessarily mean there is an error in the PHP code. To check, if the blank screen indeed is caused by the code issues, press F12 to open console >> switch to the Network tab >> reload the website with Ctrl+F5 >> check the status code of the main file (called "/"):

If the status code is 200, there's an issue with the theme. To fix it follow the instructions:
- Check which theme is active through Debugger >> Database tab >> Enable Adminer >> wp_options >> Template/stylesheet section.
- Check if there is a folder of this theme present in the website files via FTP >> wp-content folder >> Themes.
- If there is no such folder, it is necessary to change the active theme or upload the necessary theme.
- If the folder exists, the issue is inside the files of the theme. Try to upload this theme once or install the default theme instead of the broken one.
It is advised to change to the default theme when debugging the website. You can do it with help of the Debug tab >> Activate Clean 2019 Theme button. Even if the TwentyNineteen theme is not installed, it will be uploaded, installed, and activated with the help of this button.
If the status code is 500, there is an issue with the PHP code which is described below.
This error usually means there is a fatal error in the PHP code of the website. To check the error, follow the next steps:
- Open the Debugger tab >> Press Enable Debug and reload the website page to see the full error description.
- Use common sense (change the theme, disable plugins, etc.)
- Once the website is fixed and up, press Disable Debug so that the internal structure of the website is not revealed to hackers through the errors and warnings.
- If the website is hosted on EasyWP, navigate to the Easy WP tab >> press the Flush Cache button to clear the cache and observe the changes.
This error can be also fixed by disabling the theme/plugin which causes it (make sure to flush the EasyWP cache after any change in the database if the website is hosted on EasyWP). Pay attention to the level of errors. Only Fatal Error messages may cause the 500 error. The Warning, Notice, and other messages are there just for debug but they don't break the website completely.
These errors mean that the website exceeded some hardware limits like CPU or RAM. Many reasons may cause this issue: a poorly optimized website, heavy theme or plugin, number of visitors, or a DDoS attack, etc.
If the website is returning the error intermittently, you can go to Debugger >> EasyWP tab >> press the Enable UsageDD button to install this plugin (alternatively, install the plugin through the Wordpress admin dashboard).
We recommend that you read the description of the plugin at the link above to know how to debug the website with it, but here is a short list of things to check:
-
A number of queries must be ideally under 50. If it is higher, there is an issue with the plugin or the theme used.
-
The difference between the TTFB and full-page download (e.g. 1.72 | 2.08s) must be under one second. Otherwise, the theme is heavy and must be optimized or changed.
-
Memory usage must be under 50 MB. The reason for the higher usage is one of the enabled plugins of the theme. Try deactivating them one by one to find out which plugin/theme is causing the issue.
Sometimes, it is not possible to log into the Wordpress Dashboard via the Log in Button in EasyWP dashboard. In such a case follow the next steps:
- Check the siteurl and home values in the database. If they contain www version of the website, change the website URL to non-www . If you want the website to work on a www version, contact EasyWP customer support.
- If the website is already using a non-www URL, press Fix EasyWP Plugin in EasyWP tab of the Debugger.
If there is a missing Clear Cache button in the wp-admin dashboard of an EasyWP-hosted website, the reason for this is the missing EasyWP plugin. Install it with the Fix EasyWP Plugin button in EasyWP tab of the Debugger.
If the website content loads incompletely and the website shows a warning lock in the URL bar, there are http:// links in the database. They should be changed to https:// and Debugger can be of help here. Take the following steps to fix insecure content:
-
Navigate to the Database tab >> press Enable Adminer. You will be redirected to the Adminer interface.
-
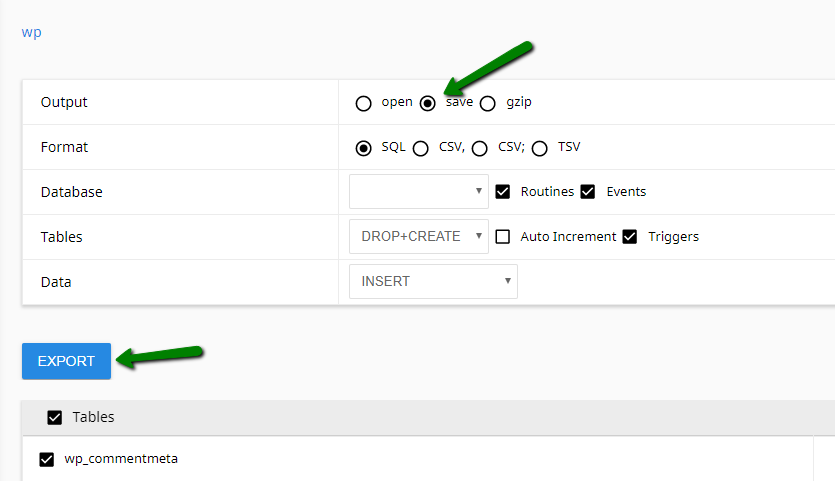
Click Export in the top left corner:

-
Change the Output to Save and press Export:
-
Open the downloaded file in Notepad++ or other text editor and change the http:// links to the https://.
-
Return to the main page of the Adminer by clicking on the database name in the top:

-
Select all the tables in Adminer and press DROP to remove them.

-
Press IMPORT in the top left corner.
-
Choose the database file with changed links and press EXECUTE. The updated database will be uploaded.
If the website is hacked/infected, the least you can do is replace default files, disable the theme and plugins. Follow these steps:
-
Remove the wp-admin and wp-includes folders with help of the Remove form in the Files&Backups tab:
-
Remove all the files in the root directory except for wp-config.php and debugger.php (it is easier to do through the FTP access).
-
Check that wp-config.php does not contain any malicious code. Remove the malicious code from it if needed.
-
Press Replace Default Files in Debugger:

-
Check and save the name of the current theme on the website (you can check it in the database) and press Activate Clean 2019 Theme. Even if the TwentyNineteen theme is infected, its files will be replaced and the clean TwentyNineteen theme will be activated.
-
You can also disable some or all plugins in the database and press the Flush Cache button, in the EasyWP tab, to activate the changes on the website.
-
Optionally, you can also try and search for malicious code in the database. It is not rare that the website URL is simply replaced with malicious links in the siteurl and home entries. Searching for "<script" in the database can also help find some malicious links.
-
Go to the Files&Backups tab >> Compress form and press Submit. The root directory will be compressed in a ZIP file like wp-files_2019-09-29_18:59:57.zip. You can customize it however you want (back up a certain folder, name your backup differently):

-
Access the website via FTP and download the generated backup.
-
Press Enable Adminer in the Database tab in Debugger to access the database.
-
Click Export in the top left corner of the Adminer interface:
-
Change the Output to save (.sql dump will be generated) or gzip (.sql.gz backup will be generated) and press Export:
That's it! You have the files and database backups now.
It is possible to restore a website from a manual backup with the help of the Adminer menu and Extract a ZIP archive option.
Please follow this instruction:
-
The minimum files that should be present to restore a website are the wp-content folder and the .sql database file. (If you already have a backup, you can check its content with View content of a ZIP archive form.)
-
It is recommended that you leave only the wp-content folder in a zip archive to avoid issues with default files and files inside the website's root directory.
-
Rename the wp_content folder to wp_content_old on the end of the website you want to replace.
-
Check the wp-content folder you want to restore for popular caching plugins, their additional files, and the mu-plugins folder. It is necessary to remove mu-plugins to avoid issues. The caching plugins can be removed now or later after the backup is restored.
-
Compress the wp-content folder and upload the archive to the destination website. You can do it via FTP.
-
Extract the ZIP file with the help of Debugger: click Files&Backups > Extract a ZIP archive option. If you extract the full backup, make sure not to replace wp-config.php accidentally (rename it to wp-config.php_bak or download it to your local PC).
-
If the website is hosted on EasyWP, once the backup was uploaded and restored, press Fix EasyWP Plugin in the EasyWP tab of Debugger to enable it on the new website.
-
In the Adminer interface drop all the existing tables there and import the database file from the backup.
-
If the database prefix is not wp_, change the prefix in the wp-config.php file.
-
Click Disable Adminer once done.
-
Now the website should be working. If there is 500 error somewhere, feel free to enable debug and check what's wrong.
The flow described below is related to the bug on EasyWP when some files were present via FTP but did not reflect on the website. This bug is fixed now so the information is mostly FYI.
To fix filesystem, take the following steps:
1. Press Fix Filesystem and flush the website cache:

2. If the issue persists, try fixing filesystem and flushing cache 3-4 more times.
3. If it doesn't help too, check the PHP error on the website. If the "missing" file is one of the WordPress default files, replace the default files. If the missing file is one of the theme/plugin files:
- copy the path to the missing file somewhere;
- disable the plugin/theme that is producing the error;
- go to the WP Admin Dashboard and install the File Manager plugin;
- open a folder where the missing file is located (yes, this simple);
- the missing file should re-appear now, so try activating the plugin/theme.
- The main file of the repository is debugger.php. It is self-dependent and is the only file you need to upload to debug websites.
- debugger.min.php is the minified version of debugger.php
- You can upload debugger-generator.php to a hosting and open it in a browser to get a debugger file with randomized name and password each time.
- Each time a login attempt to debugger happens, it sends the domain it is uploaded to and its file name to a remote API. The API waits for some time (2 hours by default) and then accesses debugger by the URL that was passed earlier to remove it from the hosting. It is done for security reasons so that debugger is removed even if the user forgot to remove the file.
- The API code is located in the easywp-cron folder and can be installed on a hosting with Python support.
- Debugger sometimes needs to upload additional files to enable some features (e.g. Adminer). All the files are hosted on CDN and located in the cdn-files folder.