| lineNumbers | true |
|---|---|
| theme | dracula |
Bologna, Apr 19, 2024
Dr. Francesco Maria Sabatini
francescomaria.sabatini@unibo.it
<style> img { display: block; margin-left: auto; margin-right: auto; } </style>

https://fmsabatini.github.io/ReproducibleWorkflow/1
https://www.youtube.com/watch?v=s3JldKoA0zw
Three key practices in Reproducible workflows 1
-
Clearly separate, label, and document all data, files, and operations that occur on data and files
-
Document all operations fully, automating them as much as possible, and avoiding manual intervention in the workflow when feasible
-
Design a workflow as a sequence of small steps that are glued together, with intermediate outputs from one step feeding into the next step as inputs
<style> img { display: block; margin-left: auto; margin-right: auto; } </style>

<style> img { display: block; margin-left: auto; margin-right: auto; } </style>
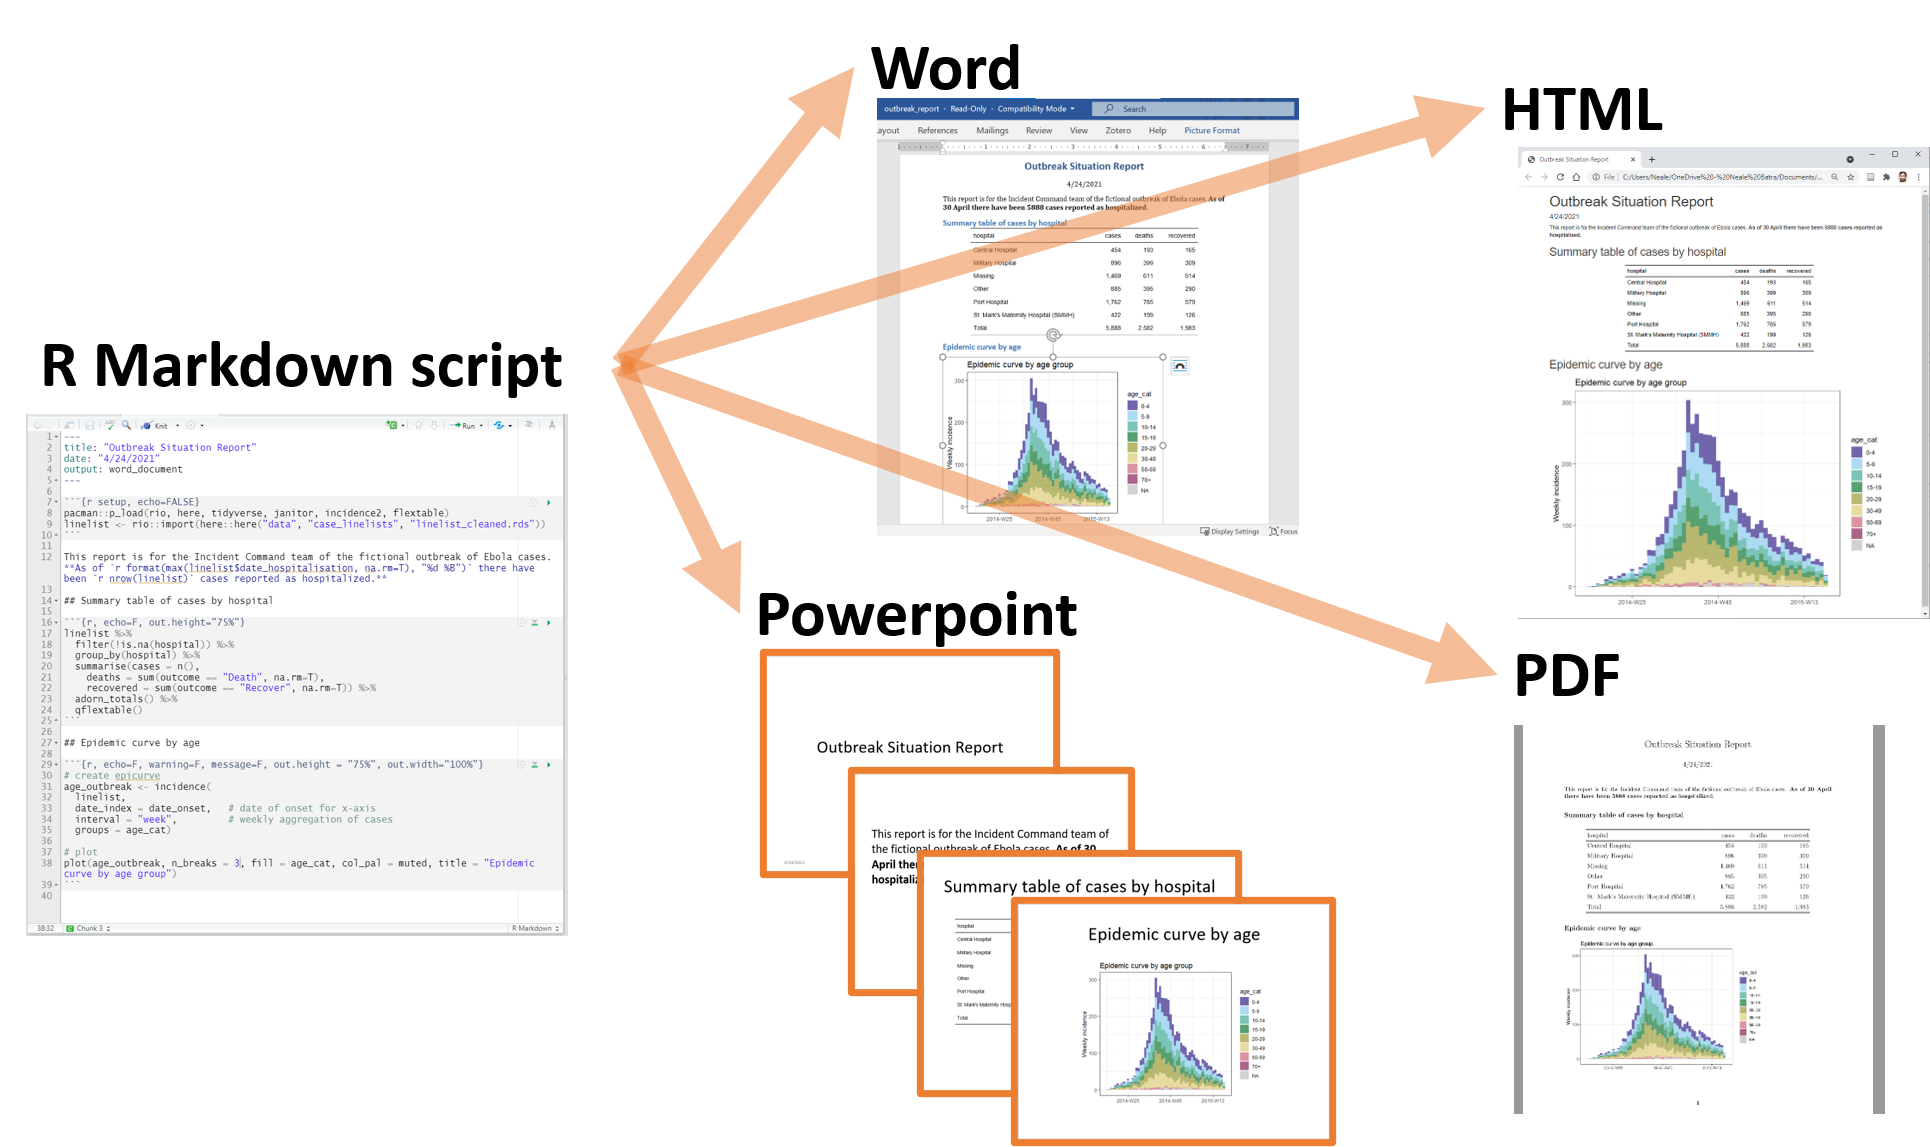
R markdown is a simple and easy to use plain text language used to combine your R code, results from your data analysis (including plots and tables) and written commentary into a single nicely formatted and reproducible document (like a report, publication, thesis chapter or a web page).
<style> img { display: block; margin-left: auto; margin-right: auto; } </style>
<style> img { display: block; margin-left: auto; margin-right: auto; } </style>

1) Edit code

3) Commit

2) Add (to the box)

4) Push (to github)
<style> img { display: block; margin-left: auto; margin-right: auto; } </style>

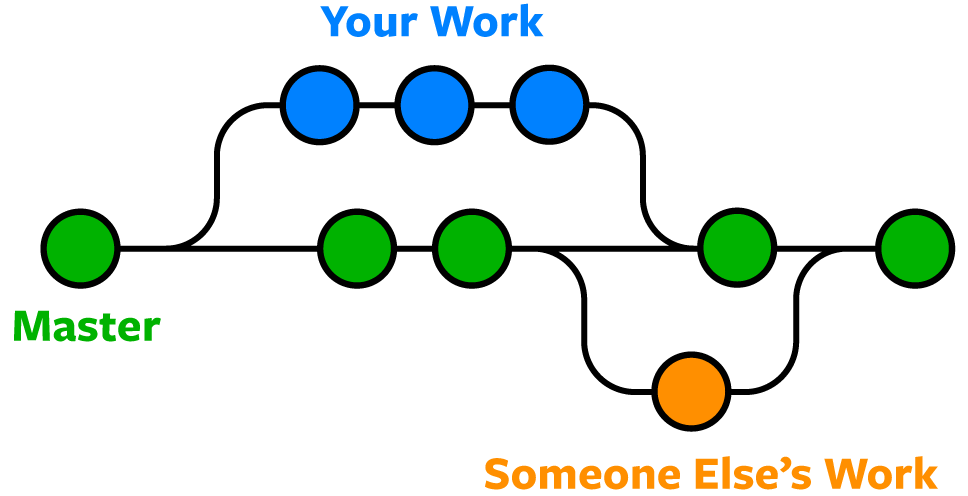
-
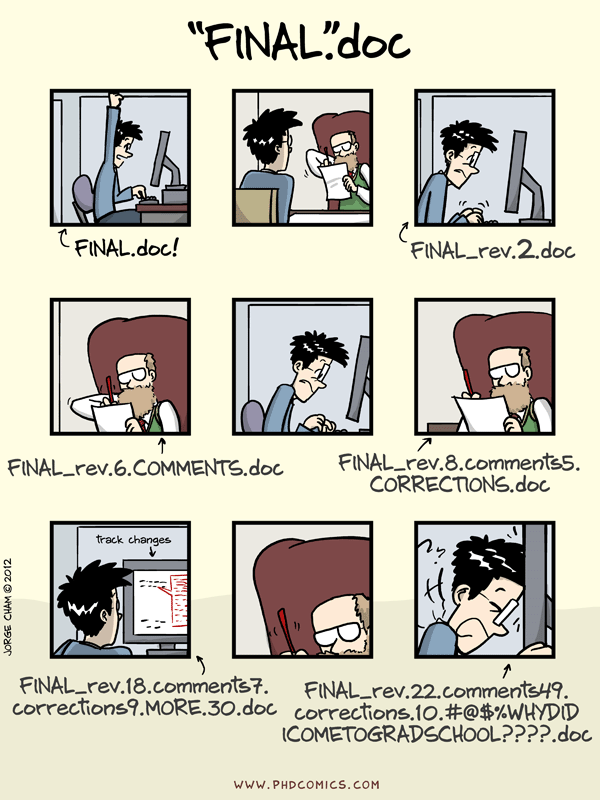
Imagine you are preparing a paper. You have all your scripts ready to reproduce the analysis and figures
-
Shortly before submitting, an evil coauthor comes out with the idea 'What if we tested a slighlty different version of the same analysis'?
-
You are not sure this is going to improve your work, but you want to try. Better not to touch your running code, though
-
You make a copy of all scripts, maybe in a new directory, and start working on the changes
-
If the new change works, you'll have a duplicated version of your script to integrate in your main workflow. If it doesn't you have to go back to the old files.
- All you need to do, is creating a branch and keep working on your files, without worrying. You can always go back to where you were if the new idea doesn't work
<style> img { display: block; margin-left: auto; margin-right: auto; } </style>
-
Check if Git is already installed on your PC
-
Open the terminal in RStudio
-
Type git --version
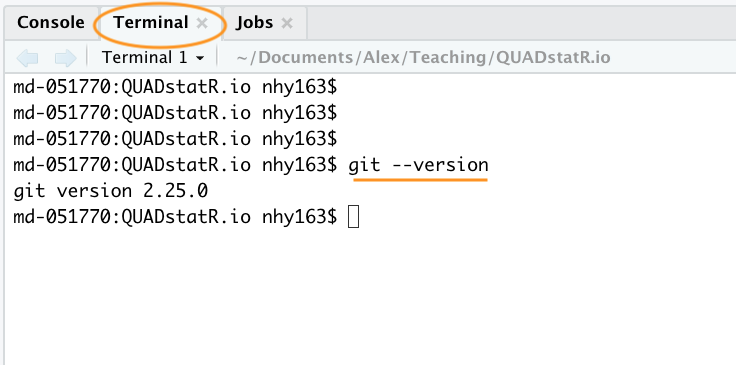
-
If you get an error (something like git: command not found), install git from https://git-scm.com/downloads
-
You probably have to restart RStudio
# command
git

# sub-command
git status

# argument
git diff README.md

# optional argument
git diff [--staged]

# every git command
git command [arguments]

# get help
git help [command]
git config --global user.name "Alessio.Chiarissimo"
git config --global user.email "alessio.chiarissimo@unibo.it"


# configure aliases
git config --global alias.unstage 'reset HEAD --'
git config --global alias.lol 'log --graph --decorate --oneline --all'


# WINDOWS ONLY: let git handle line endings
# git config --global core.autocrlf true- Go to the terminal in RStudio
# Navigate to your working directory
## For windows
cd C:/Users/user/my_project

## For Mac
cd /Users/user/my_project

# if needed you can create a directory directly from the terminal
mkdir my_project

# initialize a git repository
git init
Congratulations!
You have just created your first git (local) repository.
- Next step is creating and\or choosing the files to sync in your git repository
<style> img { display: block; margin-left: auto; margin-right: auto; } </style>

Be consistent – when developing a naming scheme for folders it is important that once you have decided on a method, you stick to it.
Structure folders hierarchically. Start with a limited number of folders for the broader topics, and create more specific folders within these as and when they are required.

- For instance you can create a Markdown file, and save it as myproject.Rmd


<style> img { display: block; margin-left: auto; margin-right: auto; } </style>
- Now that we made a change in the repository we can stage (=add) the changed file and commit it
# Check what happened in the repo
git status

# Stage your change
git add myproject.Rmd

# Commit your change and add a message -m
git commit -m "This is my first commit!"

# Check what happened to your repo history
git log
1) Edit code
2) Add (to the box)
3) Commit
<style> img { display: block; margin-left: auto; margin-right: auto; } </style>

Never ever touch raw data. Store them permanently, and use scripts to produce derived, clean datasets for analyses
– Francisco Rodríguez-Sánchez, Estación Biológica de Doñana (CSIC)
Git is most efficient with text-based files. Data are not conveniently version controlled in GIT. Besides GitHub has limited storage space available (especially for private projects)
- 100 MB per file, 500 MB per private repository (2 GB for paid accounts).
- 100 GB for public repositories.
- Larger files (up to 2 GB) can be attached to releases
Data version control systems do exist, but are not treated here
<style> img { display: block; margin-left: auto; margin-right: auto; } </style>
A remote in Git is a common repository that all team members use to exchange their edits. In most cases, such a remote repository is stored on a code hosting service like GitHub or on an internal server.
- You first need to create a remote repo, e.g., on GitHub (Registration needed)

- Now you can set-up the 'remote' you want synchronize your local repository with.
- The remote is traditionally called 'origin'

# …or push an existing repository
#                 from the command line


# Setup a remote called origin
git remote add origin
     \ https://github.com/fmsabatini/MyFancyRepo.git

# name main branch as 'main'
#             [instead of the default 'master']
git branch -M main

# push all local commits in the 'main'
#                 branch to the remote
git push -u origin main- in your Rstudio terminal, go to the folder of your repository, and type the instructions above
<style> img { display: block; margin-left: auto; margin-right: auto; } </style>

-
- I send all my local commits to the Remote Repositories
-
- Somebody made a change in the Remote Repository and I need to sync my local Repository
-
- I'm not sure what happened in the Remote. I check for updates, without integrating them in my Working Directory
<style> img { display: block; margin-left: auto; margin-right: auto; } </style>
- Add a Readme to your Remote Repository and pull it to your local Repository

git pull
git lol

#or.. in alternative
git fetch
git lol
git merge- Modify your readme locally (with notepad or any similar text editors) and push the changes to the remote
git add Readme.md
git commit -m "Modified Readme"
git push<style> img { display: block; margin-left: auto; margin-right: auto; } </style>
You can choose, whether your repo should be public or private (and with whom to share):
- Public repositories are accessible to everyone on the internet.
- Private repositories are only accessible to you, people you explicitly share access with, and, for organization repositories, certain organization members (some features won't be available)
If you choose to go public (often good), don't forget to choose a license:


<style> img { display: block; margin-left: auto; margin-right: auto; } </style>
# create new branch called 'Alternative'
git branch Alternative
# move the pointer to the new branch
git checkout Alternative- All the commits done in the new branch, won't affect the master branch.
# move the pointer to the master
git checkout master
# merge the 'alternative branch' onto the master
git merge Alternative- Once the new branch is ready, you can merge it with the master
git help --all

git init            #Create an empty Git repository or reinitialize an existing one
git status          #Show the working tree status
git add             #Add file contents to the index
git commit          #Record changes to the repository
git log             #Show commit logs
git diff            #Show changes between commits, commit and working tree, etc
git checkout        #Switch branches or restore working tree files

git branch          #List, create, or delete branches
git merge           #Join two or more development histories together

git remote          #Manage set of tracked repositories
git push            #Update remote refs along with associated objects
git pull            #Fetch from and integrate with another repository or a local branch
git fetch           #Download objects and refs from another repository
Create a local copy of any repository on GitHub that you have access to
- If you have write permissions, you can sync between the local and remote locations. Any changes you push to GitHub will affect the original repository.
- If you clone a repository that you do not have write access to, GitHub will prompt you to create a fork automatically.
<style> img { display: block; margin-left: auto; margin-right: auto; } </style>
See for instance my repository: https://github.com/fmsabatini/MyFancyRepo
It contains an essai on plant biodiversity, which is...improvable
You could open an issue to flag mistakes... or you could Fork it

Sometimes it's easier to fix the problem directly, rather than explaining the problem to the mantainer of the code. Pull requests come to our help here:
- Fork MyFancyRepo
- Edit my Essai (directly in Github) and corret 1/2 typos
- Send a Pull request to the original developer
Note how, after forking MyFancyRepo, you are redirected to the url github.com/YOURNAME/MyFancyRepo. This is now a mirror or MyFancyRepo, which is not automatically synced with the original one
By writing fixes #1 in your pull request message you can link your pull request (or commit!) to a specific issue. Learn more
Also, note how the two paragraphs are organized. The first has One Lemma per line, the second has the whole paragraph without any breaks. See how they are rendered in the md. What is the advantage of either approach?
<style> img { display: block; margin-left: auto; margin-right: auto; } </style>


<style> img { display: block; margin-left: auto; margin-right: auto; } </style>

- Time for the second course of the menu: RMarkdown. Warning: There will be many cats
<style> img { display: block; margin-left: auto; margin-right: auto; } </style>
- Go to our BiomeLab internal website: https://github.com/fmsabatini/BIOME_LabWiki
- Edit the file Members.md with your personal data.
- If you're already listed there, make sure that your duties are properly described in the file LabTasks.md

<style> img { display: block; margin-left: auto; margin-right: auto; } </style>

<style> img { display: block; margin-left: auto; margin-right: auto; } </style>
In collaborative projects, or public project, one can open an Issue to flag some unexpected behaviour of the code (bugs) or other kind of problems.

<style> img { display: block; margin-left: auto; margin-right: auto; } </style>
You can also start Projects linked to your repository(ies), where you can assign tasks, responsible people, and timelines. These tasks can be cross-linked to issues and commits, structuring your collaborative projects in a flexible and transparent manner
