Welcome to Level 1 of the assignment! This level will introduce you to Docker and ROS, essential tools for modern robotics development. By the end of this level, you'll have Docker and ROS up and running and will be ready to dive into more advanced topics.
- Introduction to the Concepts
- Install Docker, ROS and test built-in Commands
Imagine you are developping a code for the Rover. You install some required libraries in your computer and work on the implementation. All your local tests go fine, but now that you want to install your code on the on-board computer of the Rover, you realize that the libraries are not available as the on-board computer is running a different OS.
Now imagine you could package your application, along with all its dependencies and settings, into a neat little box. This box can then run on any computer, regardless of its environment or OS. This is what Docker does for you!
Docker is an open platform for developing, shipping, and running applications. It allows you to separate your applications from your infrastructure, making it easier to manage and deploy them quickly and consistently.
A container is a lightweight, standalone, and executable software package that includes everything needed to run a piece of software: the code, runtime, system tools, libraries, and settings. Containers are isolated from each other and from the host system, ensuring that your application runs the same everywhere.
An image is a read-only template with instructions for creating a Docker container. Think of it as a snapshot of your application and its environment at a specific point in time. Images can be shared via Docker Hub, making it easy to distribute your application.
A Dockerfile is a text document that contains all the commands needed to assemble an image. Consider it like a list of terminal commands to execute to create your environment with its dependencies. By automating the image creation process, Dockerfiles ensure that your images are consistent and reproducible.
docker --version: Check Docker version.docker build -t <name> .: Build an image from a Dockerfile. (We have a script for that)docker run <image>: Run a container from an image. (We also have a script for that)docker ps: List running containers.docker stop <container_id>: Stop a running container.docker rm <container_id>: Remove a container.docker image list: List installed images.docker rmi <image_id>: Remove an image.
The Robot Operating System (ROS) is not an operating system in the traditional sense. Instead, it is a flexible framework for writing robot software. It provides a collection of tools, libraries, and conventions to simplify the task of creating complex and robust robot behavior.
ROS is widely used in both academia and industry for developing cutting-edge robotic applications. Its modularity, extensive toolset, and large community support make it an excellent choice for building scalable and maintainable robot software.
Let's imagine someone is developing a Robotic Arm, and you are in charge of a Control Interface for it. How will you send the commands to the code controlling the Arm? How can we communicate from different machines? What if we want more than one system receiving the same piece of information? All of this is solved thanks to ROS!
A node is a process that performs computation. In a robot, you might have different nodes for controlling motors, processing sensor data, and planning paths. Nodes are designed to be modular, so you can easily swap out or upgrade individual components of your system.
Topics are named channels over which nodes exchange messages. A node can publish a message to a topic, and other nodes can subscribe to that topic to receive the message. This publish-subscribe model decouples the production of information from its consumption, making your system more flexible and scalable.
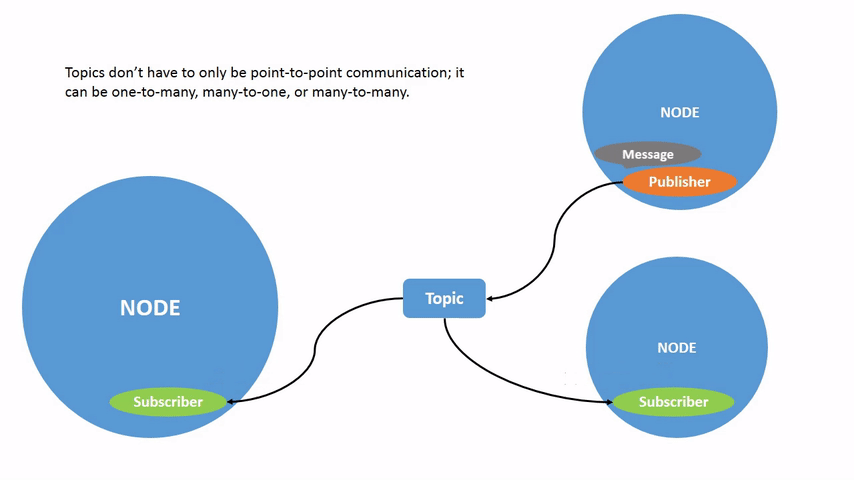
Messages are simple data structures, comprising typed fields. They are used by nodes to communicate with each other through topics, services or actions. For example, a message might contain the position of a robot, the reading from a sensor, or a command to move.
Services provide a way for nodes to communicate using a request/response model. A service represents an RPC (Remote Procedure Call) communication model: one node sends a request message to another node and waits for a response. This is useful for tasks that need to be initiated by an external trigger.

Actions are similar to services but are designed for long-running tasks. They allow for feedback and preemption, meaning you can get updates on the progress of the task and even cancel it if needed. This is useful for complex behaviors like navigating to a goal or performing a sequence of movements.

A ROS 2 package is a fundamental unit for organizing software in ROS 2. It typically contains a set of related nodes, libraries, scripts, or configurations. Packages allow developers to modularize their code, making it easier to share, reuse, and maintain. Think of it as a module that can be used on its own. Each package can include source code, message and service definitions, launch files, and other resources. The structure of a ROS 2 package includes mandatory files such as package.xml (metadata about the package) and CMakeLists.txt (build instructions), or setup.py for Python packages.
If you haven't installed the dependencies yet, follow the guide for your system:
Note
If you have too much trouble with the installation, no need to spend much more time on this and the rest of the assignement. Just show us that you understood the concepts.
Now that you have a basic understanding of Docker and ROS, let's get hands-on!
-
Run the Docker container:
Open your terminal and go inside the docker_humble_desktop folder. Type the following command, according to your system:
./run.sh (Mac or Linux)
run.bat (Windows)
You should then see the image downloading for the first time. Once it is done, you will be directly placed inside the Docker container.
-
Start exploring ROS 2 commands. Once inside the Docker container, you can try the following commands to verify your setup:
ros2 --help
ros2 topic list
ros2 node list
-
Run a ROS 2 node. If previous command worked, we can now try to start a node:
ros2 run examples_rclpy_minimal_publisher publisher_member_function
-
Open a new terminal inside the container. Now that the node started, we need to open another terminal window to monitor the node:
docker exec -it base_humble_desktop bashThis will place your new terminal window inside the container.
-
Monitor a node. If previous commands worked, we can now try to start a node:
ros2 node list
ros2 topic list
ros2 topic echo /topic
Observe the difference of output with the first two commands. You can now see that their output is not empty, as we just started a ROS 2 node that publishes information. The last command shows you the information sent.
By completing these steps, you have now a running Docker container with ROS 2 Humble installed. You are now ready to start exploring ROS and building your robotic applications!
Congratulations on completing Level 1! You are now ready to move on to creating your first node in Level 2.
Note
You can stop the container with CTRL + D inside the first terminal you opened inside the Docker. We will open it back later.